Introducing All-New Profile Pages With Hints
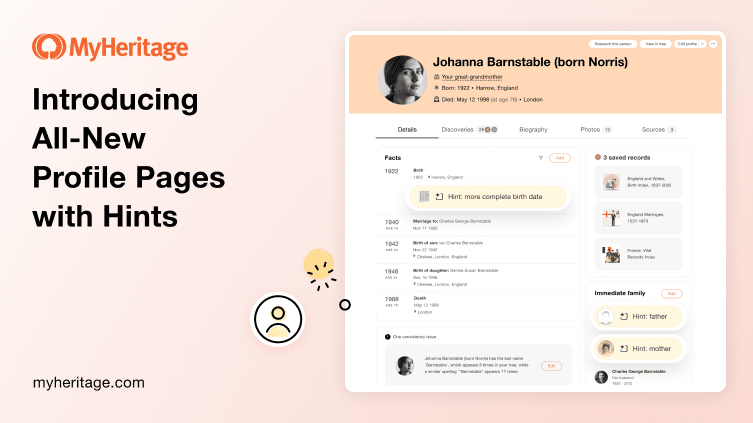
The profile page is among the most visited pages on MyHeritage, and is one of the most valuable ones for genealogists. Many users requested that we add additional capabilities to the page. You asked, and we listened! Today we are proud to release the result: the all-new profile pages. This is a whole new experience that is more than just a single page; it’s a centralized hub for everything known about a person.
This major enhancement includes a more organized layout and cool features to help you maximize your discoveries about your ancestors and relatives. We’ve also added Hints, which are a unique, highly useful way of presenting new details from your matches within the context of an individual profile. The profile pages remain free and are now more useful than ever!
The new profile pages are available on the MyHeritage website on desktop. We will soon add Hints to the MyHeritage mobile app as well.
We would like to extend our thanks to the MyHeritage team that developed the new profile pages. A special thank you goes to Uri Gonen who was instrumental both in creating a vision for this project and bringing it to fruition.
Accessing the Profile Pages
You can access the profile pages from many areas in the MyHeritage website, including from the different family tree views, the Discoveries section, My Photos, when viewing DNA Matches and Smart Matches™, and more. Below, we show examples for the two most popular ones.
To access the profile of an individual from the family tree, visit your tree and click the name of the person you wish to research. This opens the left panel of the tree. In the left panel, click the “Profile” icon, marked below in red.
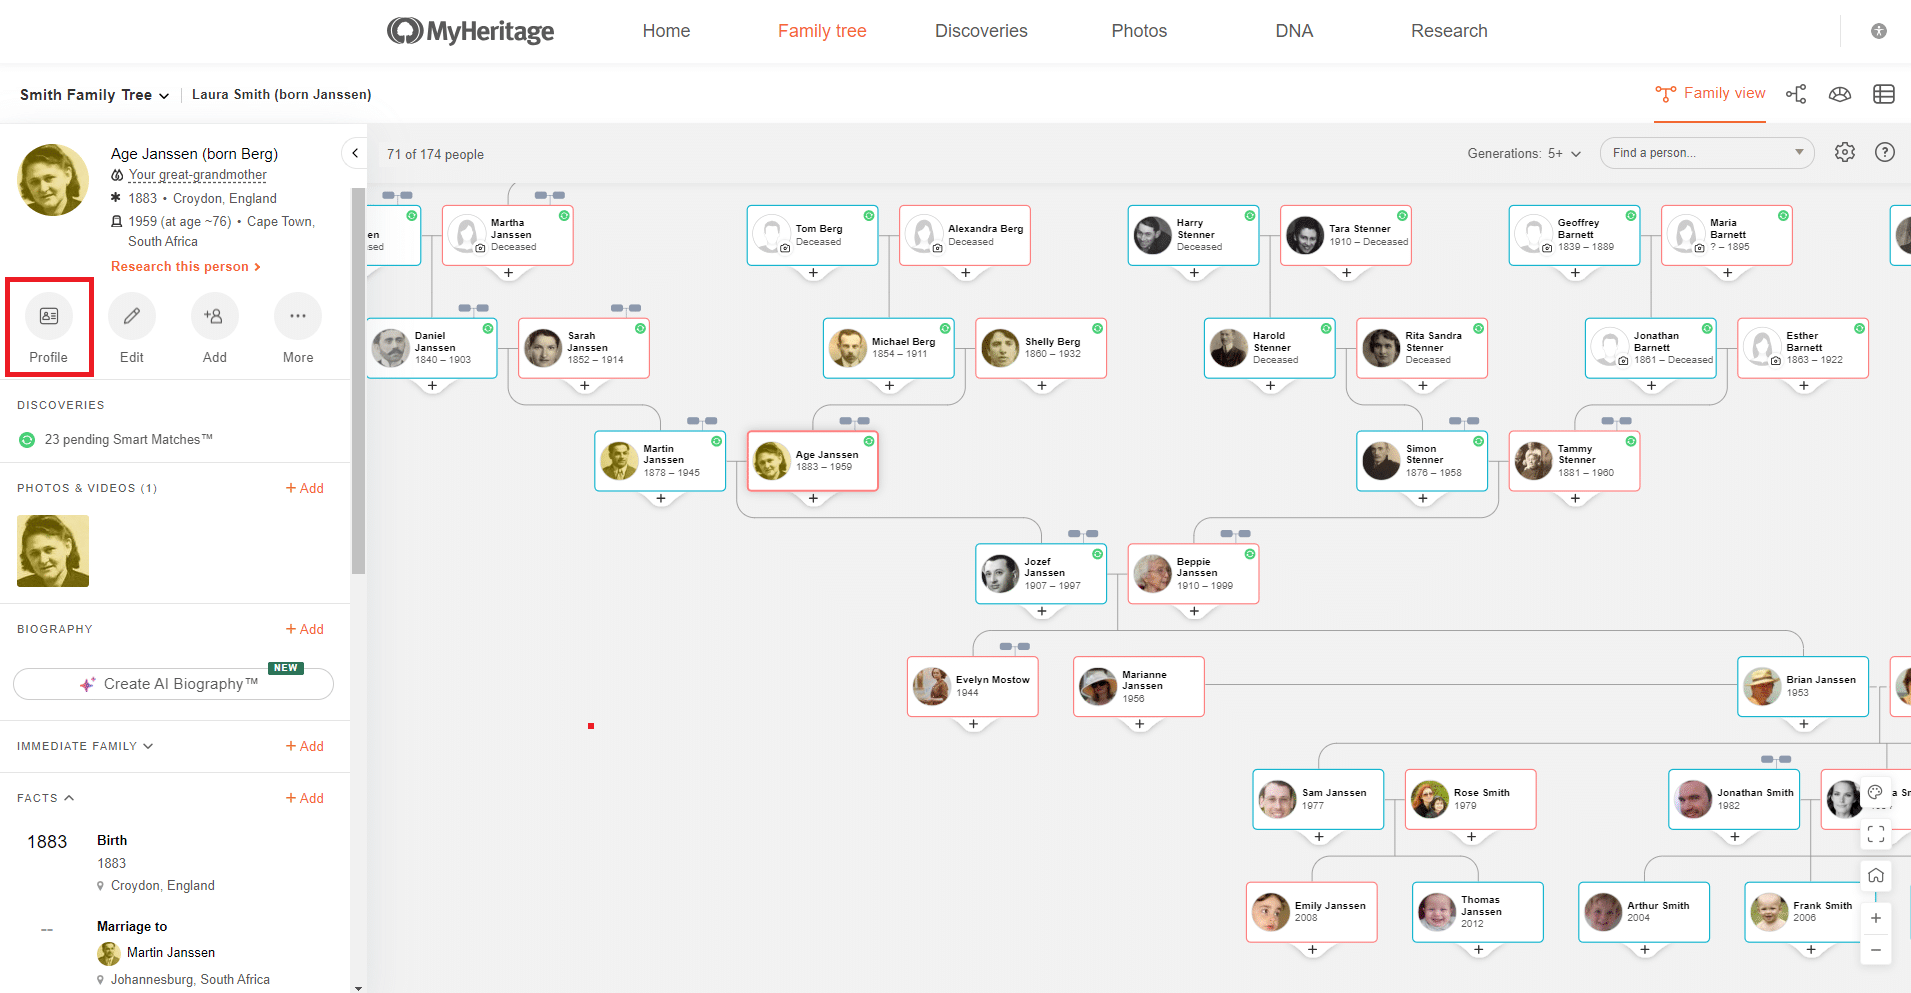
Accessing the profile pages from the tree (click to zoom)
If you find a profile of interest while searching in MyHeritage’s search engine for historical records, the record page will have a link to view the profile page in the originating family tree, as marked in red in the example below.
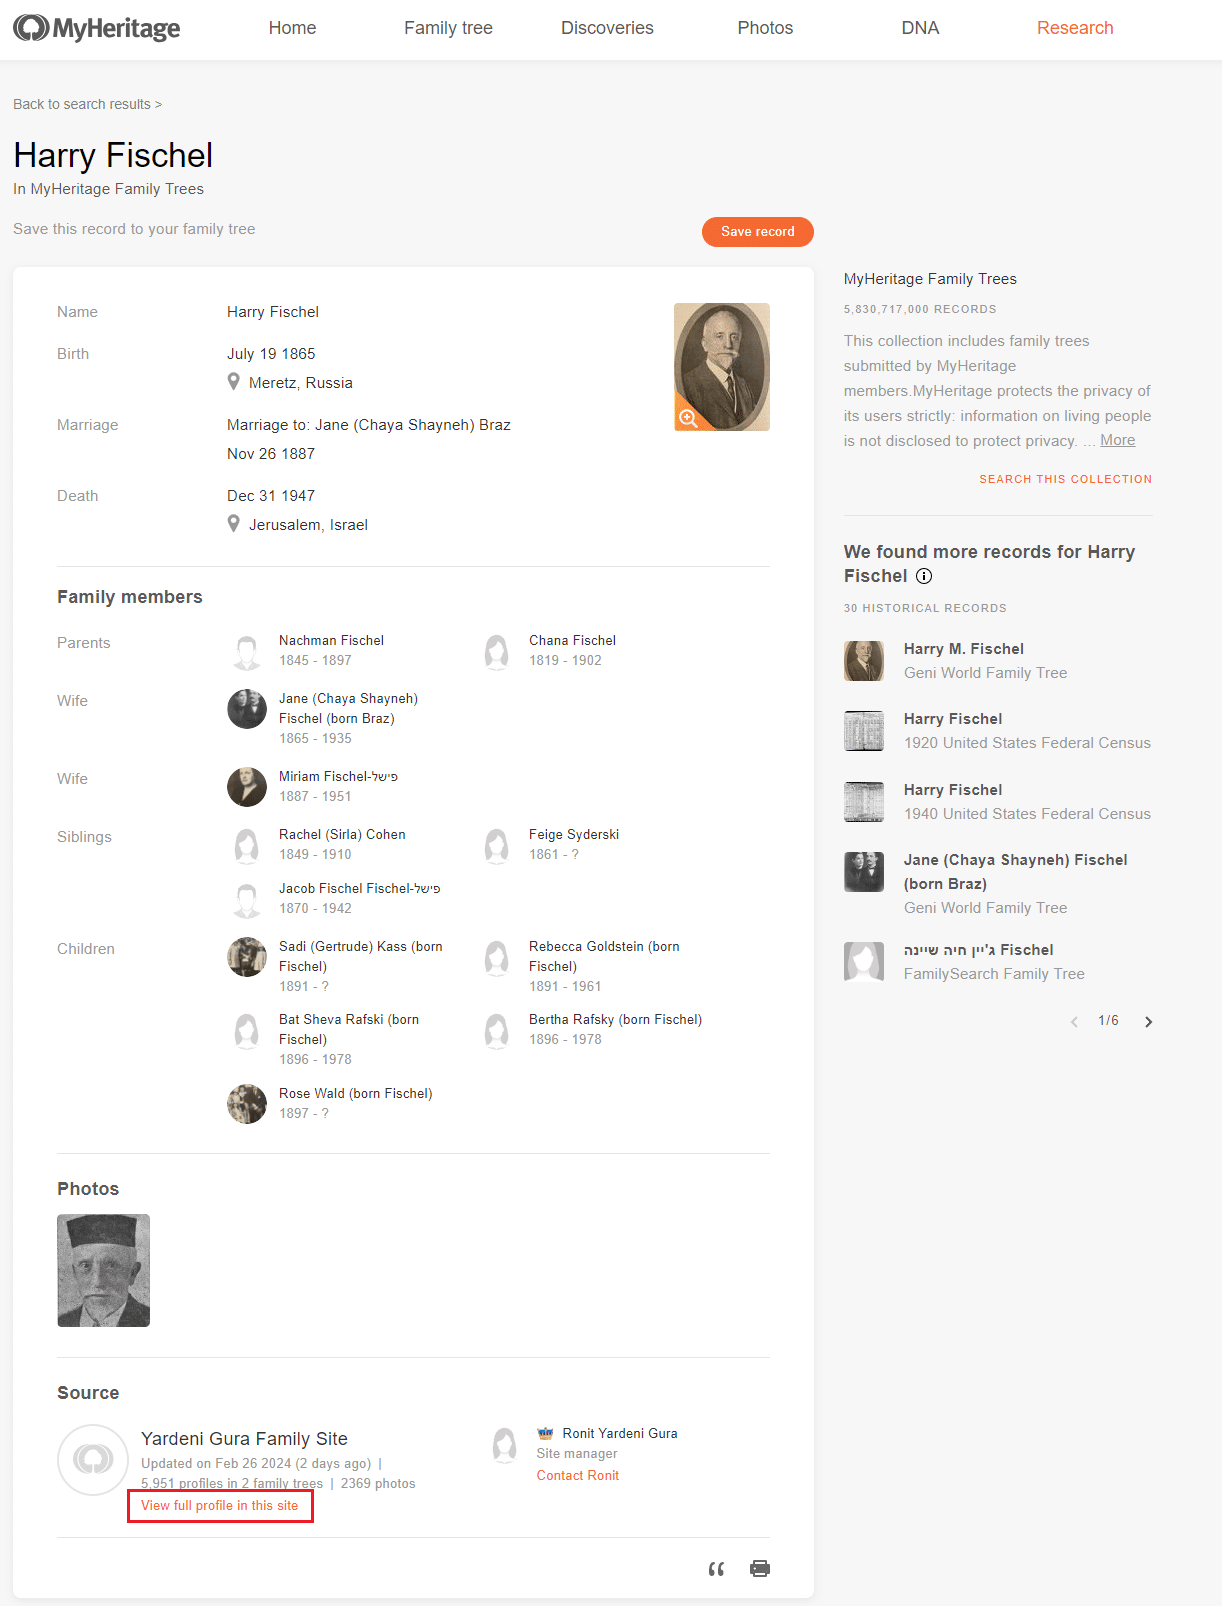
Accessing the profile pages from a record page (click to zoom)
Profile Pages Walkthrough
The new profile pages are filled with useful features so you can review the existing information about a person, add or edit new details directly on the page, research the person, and much more. The list of functionalities is extensive, and this blog post covers the highlights. To try each and every one, we encourage you to visit your tree, open the new profile pages, and start exploring!
The new profile is implemented as multiple tabs. Any time you see a number next to a tab, it indicates the presence of information; in other words, it shows you at a glance that this tab contains useful information.

Tabs in the new profile pages (click to zoom)
The top section of the page remains the same regardless of which tab you are on. It shows the vital information about the person, and provides several useful buttons to research them further, view them in one of the family tree views, and edit their profile.

The top section includes vital details and useful shortcuts (click to zoom)
Below the person’s name you can see their relationship to you. Next to the relationship are icons indicating if this person is a blood relative, and color coding that indicates to which branch of your family they belong. Clicking the relationship opens the relationship diagram; this shows the exact path through which you are related. Below the relationship are facts about the person’s birth and death, including dates and places, as well as where they are buried.
Several buttons are displayed at the top of this section. “Research this person” searches for this person in MyHeritage’s historical record search engine.
“View in tree” opens the default view of your family tree, showing this person in the tree. To open one of the other family tree views, click the arrow to open the menu, and select which view of the family tree you would like to use.
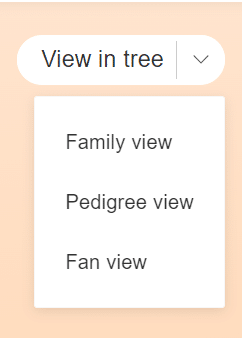
“View in tree” options in the profile pages
“Edit profile” opens a popup window where you can quickly edit vital details about the person. To edit the profile more extensively, click the arrow next to “Edit profile” and select “Edit full profile” from the menu. This takes you to the full edit profile page.
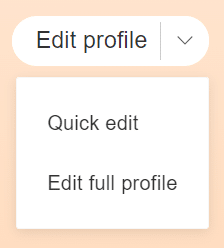
“Edit profile” options in the profile pages
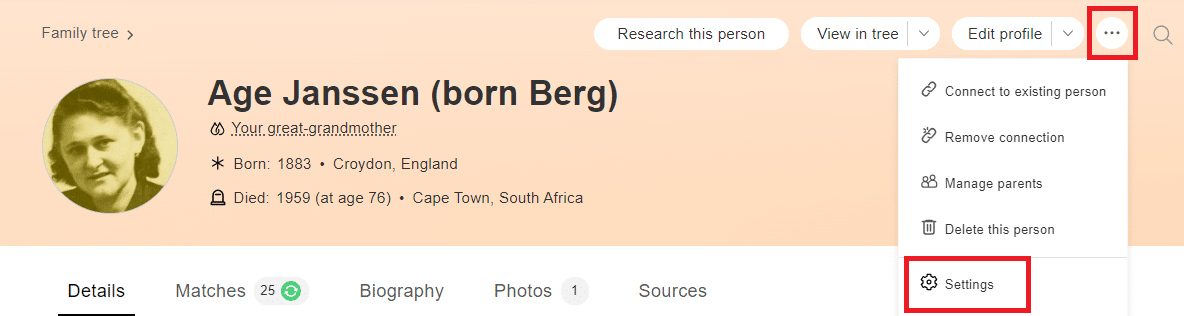
The three-dots icon opens the “More” menu with more actions for managing the person’s profile. These include all the actions that until now were only possible in the left panel of the family tree. You can connect the profile to an existing person in the tree (e.g., a parent from another branch), remove a connection, add adoptive or foster parents, or delete this person from your tree. You can also access the settings for your family tree.

“More” menu from the profile pages
Click the magnifying glass icon in the top-right corner of the top section to open a search field where you can enter the name of any person you want to search for in the family tree. Clicking the list icon on the right will show you a list of recently visited profiles that you may want to view.

Search for another person in the tree
Details tab
The Details tab opens by default and is the most important one, but the other tabs are very useful too.
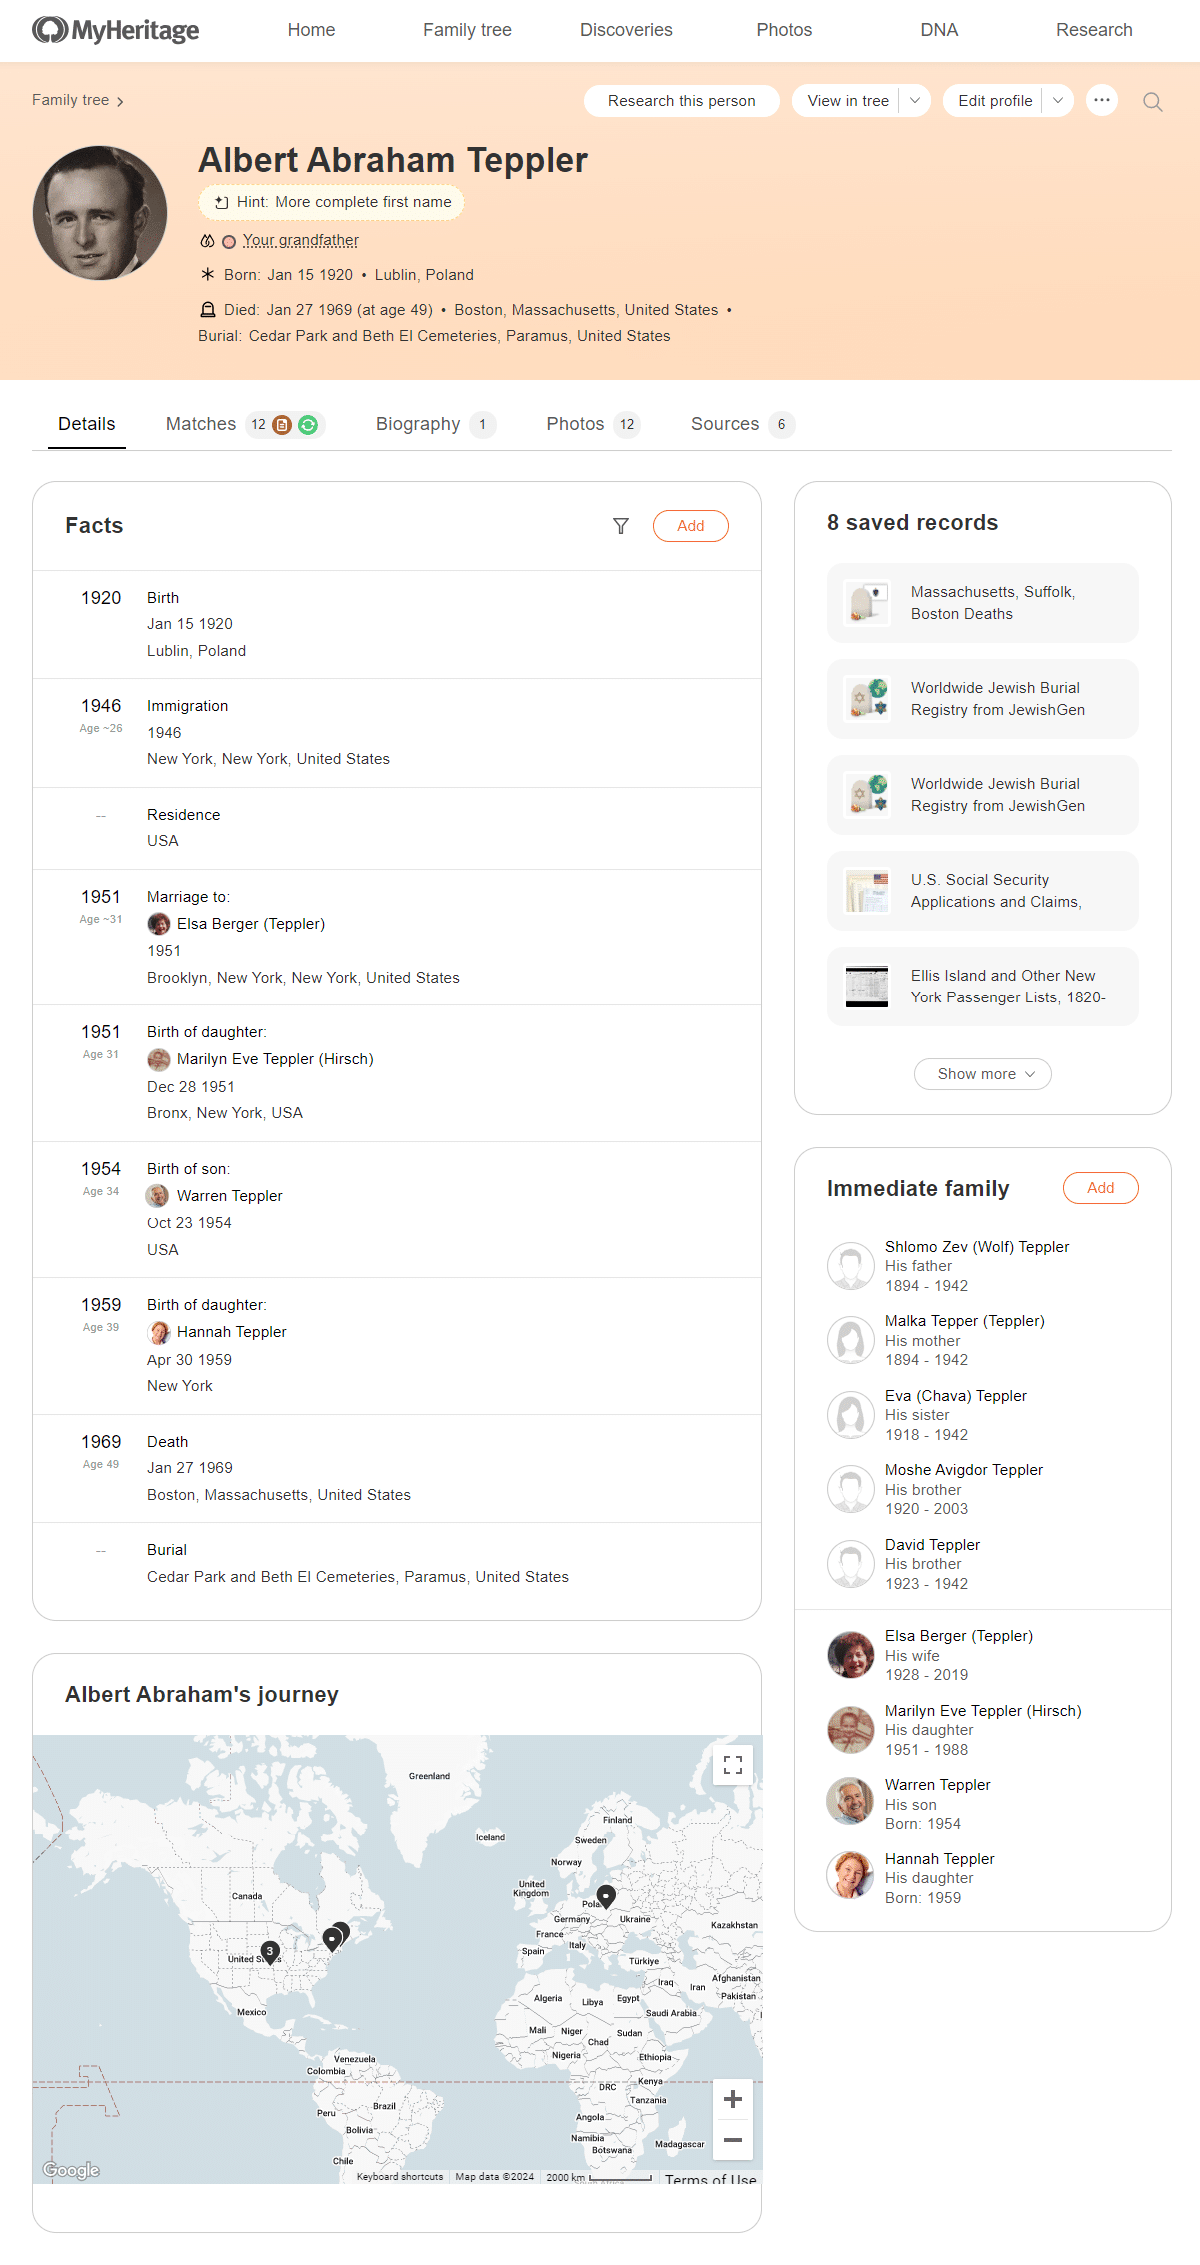
Details tab — Facts section (click to zoom)
The Details tab displays the person’s main life events, under the section labeled “Facts”. These life events include birth, marriage, birth of children, immigration, residence, and more. Click the “Add” button to add more facts to the profile. Click any row to edit the information that appears there, or click the name of any relative on the page to visit their profile.
Details tab — Facts section (click to zoom)
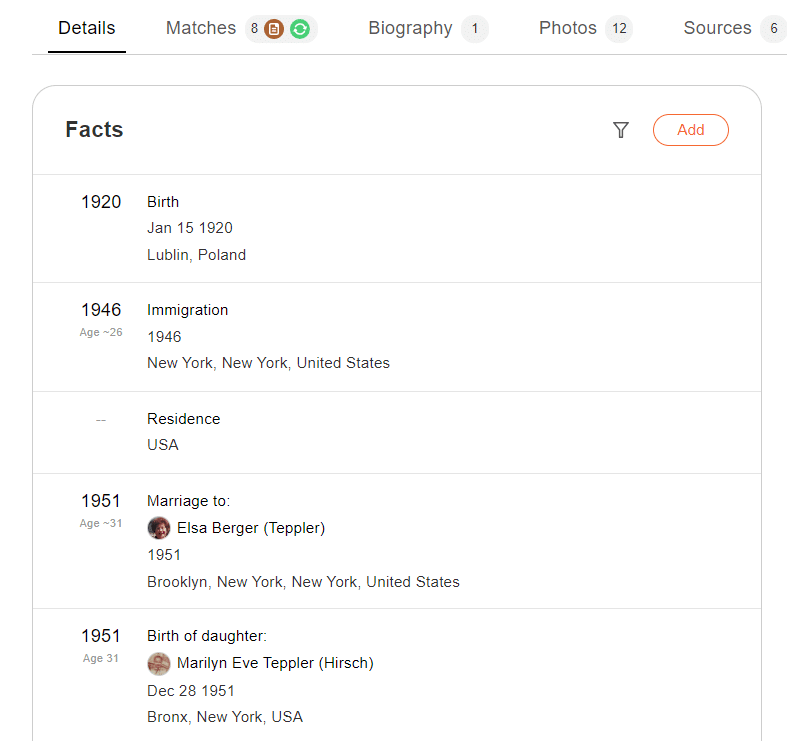
If you prefer not to see the life events of the person’s children, click the filter icon and uncheck the box (marked below in red).

Filter option for the Facts section
Any historical records you’ve saved about a person appear on the right-hand side (marked below in red). These can be confirmed Record Matches, or records that you previously found on MyHeritage’s historical record search engine and saved to your tree. These are the sources for the information that appears in the person’s profile.
Below the saved records is a list of immediate family members (marked below in green).
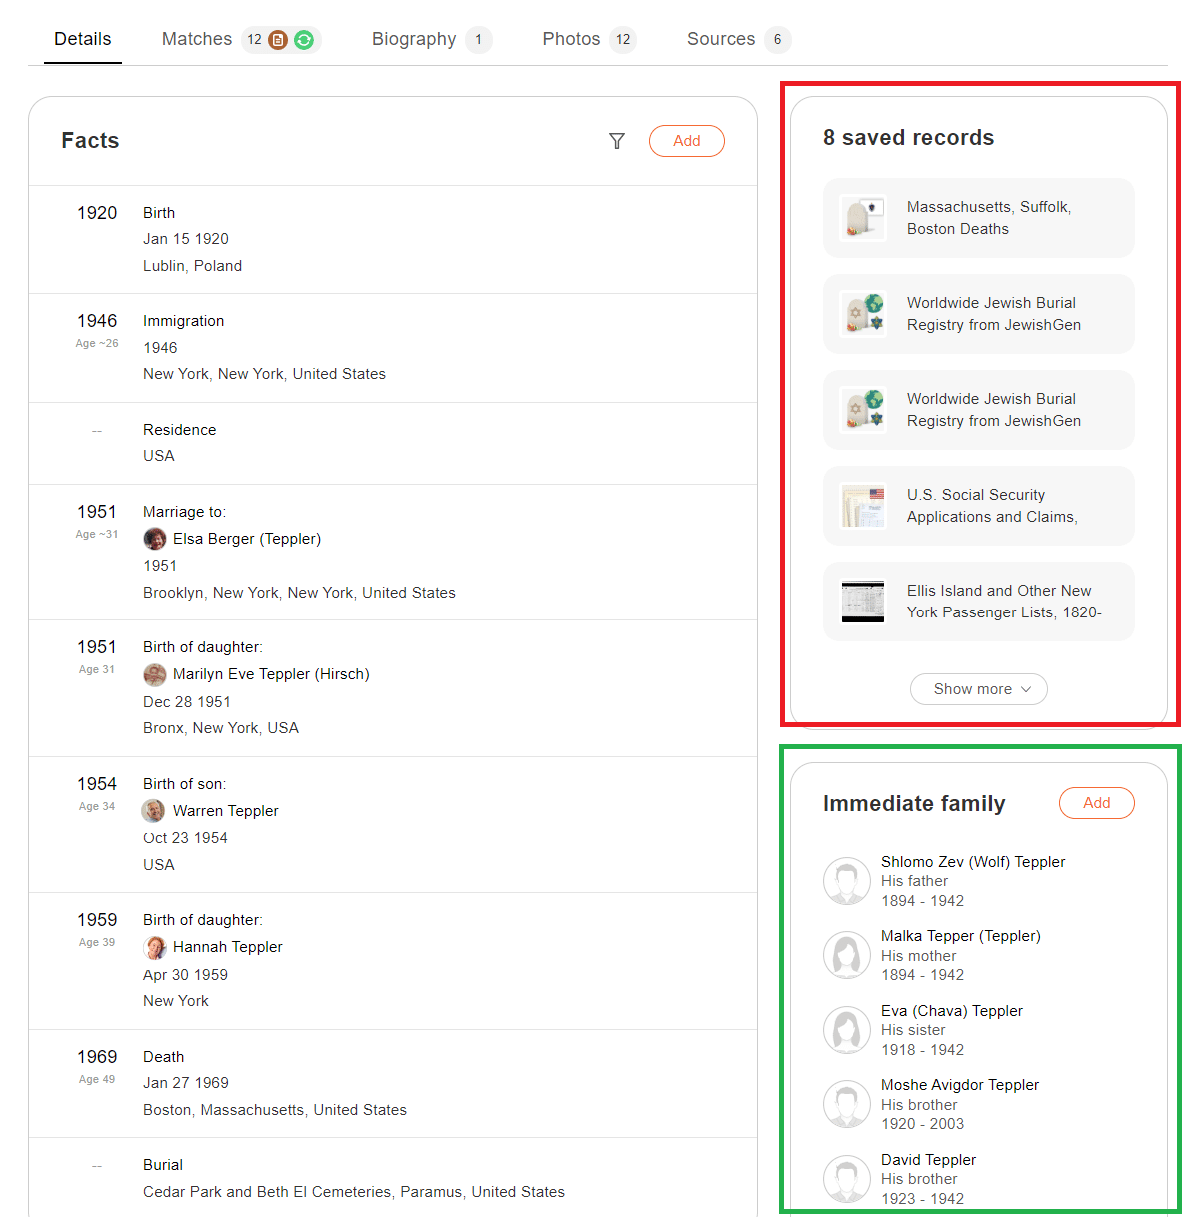
Details tab — “Saved records” and “Immediate family” sections (click to zoom)
If the Consistency Checker identified any inconsistencies in the profile, these will appear below the Facts section. If you don’t see such a section, it means that no inconsistencies were found.
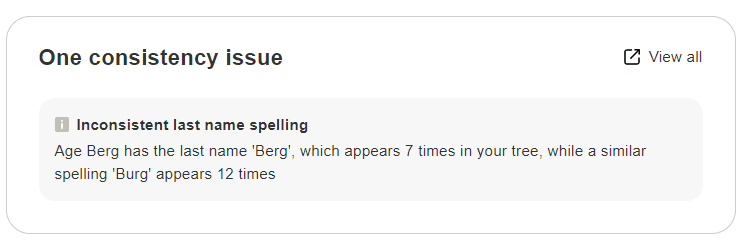
Details tab — “Consistency issues” section
At the bottom of the page is the “Life journey” section, featuring an interactive map that charts the places where the person’s life events occurred. Click any of the pins on the map to view the details of the life events that occurred in that location. To edit an event or add more details, click on a pin on the map, hover over the fact you want to edit, and then click the pencil icon.

Details tab — “Life journey” section (click to zoom)
Introducing Hints
Hints are an important and useful new addition to the profile pages, and they appear in the Details tab whenever they are available.
MyHeritage’s Smart Matching™ and Record Matching technologies reveal valuable new information about individuals in your family tree by matching your family tree to billions of historical records and millions of other family trees. However, managing Smart Matches™ and Record Matches can be overwhelming and time-consuming. They typically offer many new details, but unless you go through them one-by-one, there’s a chance you might miss important clues to help you reach that next breakthrough discovery for an individual you care about the most. Hints overcome this challenge by taking the new information provided by your existing matches and displaying it in context, directly within the profile, and emphasizing exactly which new information those matches can add to your family tree.
Hints rely on the same matching technology you know from Smart Matches™ and Record Matches, but package it in a new way that focuses on the new information that you don’t have, for the individual whose profile you are now viewing. Hints surface the matches that are available to you and can enrich your tree in three very important ways: by adding more complete life events, more complete details for life events already listed in the tree, such as a birthplace or birth date, or revealing new relatives.
In the example below, you can see the Hint showing that MyHeritage has found a more complete birth date, marked in red.
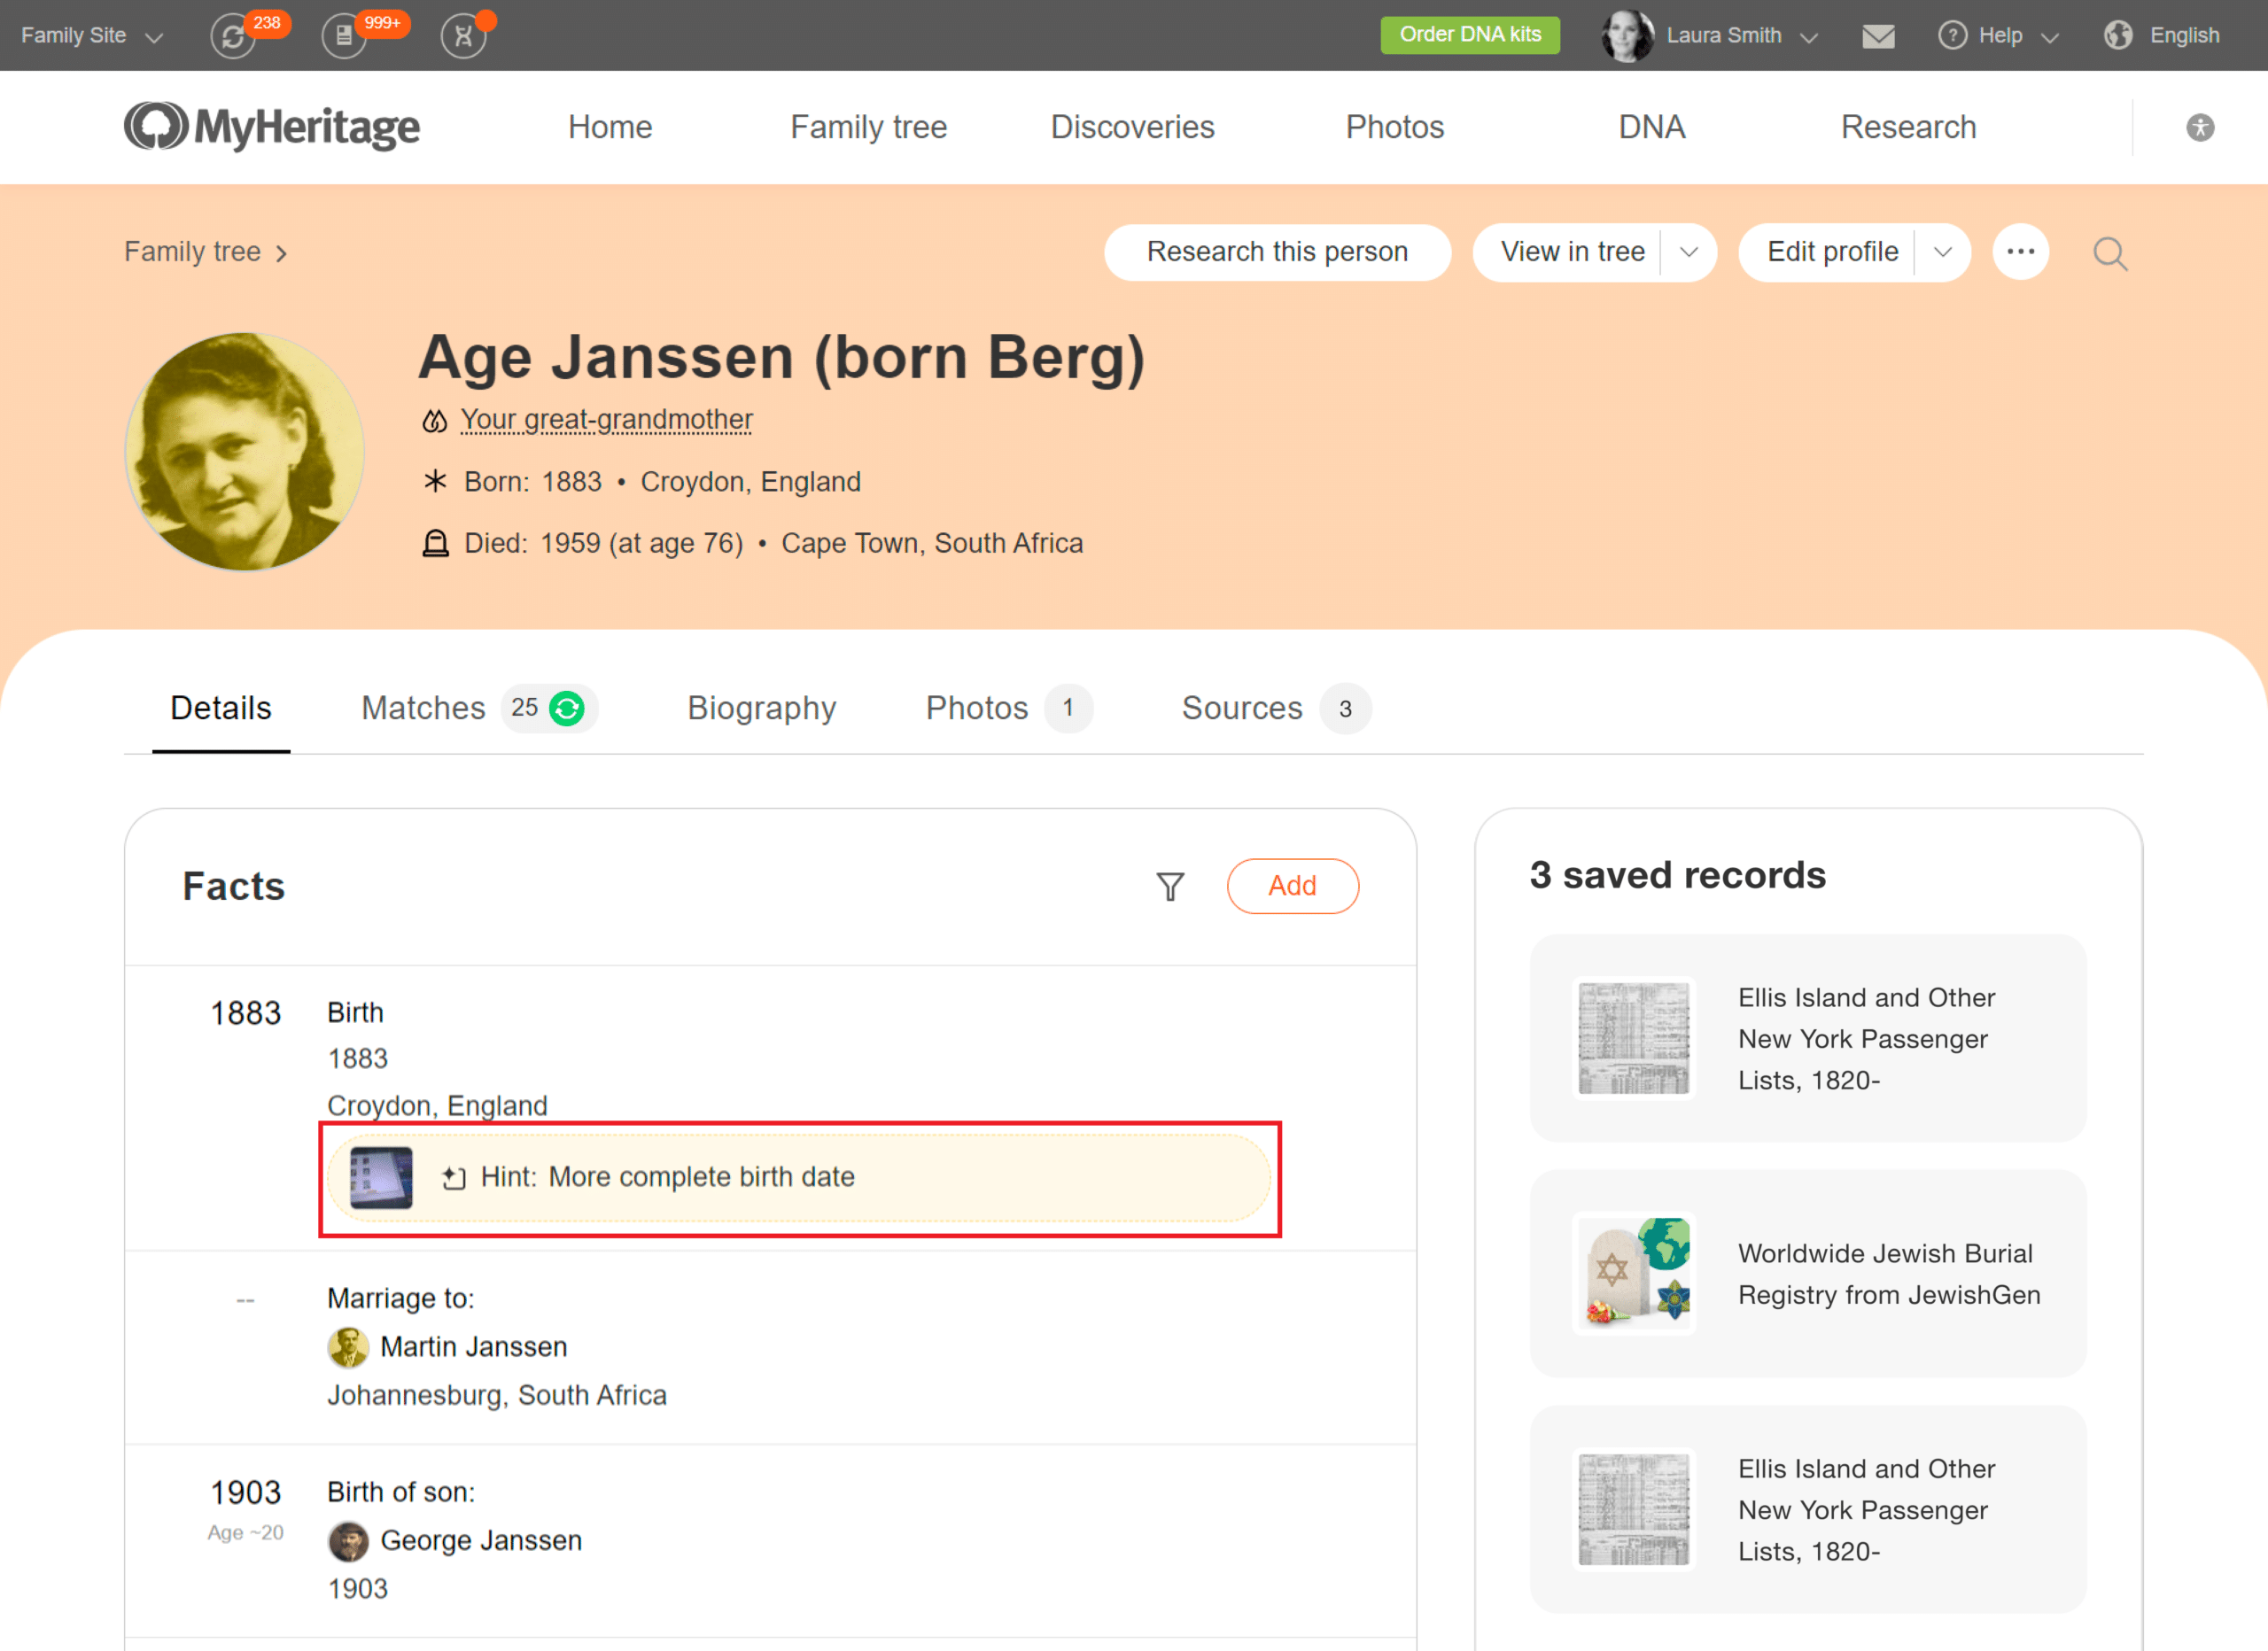
Hints indicate new information that can be added to the tree profile (click to zoom)
Click any Hint to review it. This opens a panel on the right-hand side of the page. The new information is highlighted in the Hints panel, just as it’s highlighted on the page. The panel also shows the sources that Hint is based on. Scroll down the panel to see a side-by-side comparison of the information in your family tree and the information from the matching family tree or historical record.
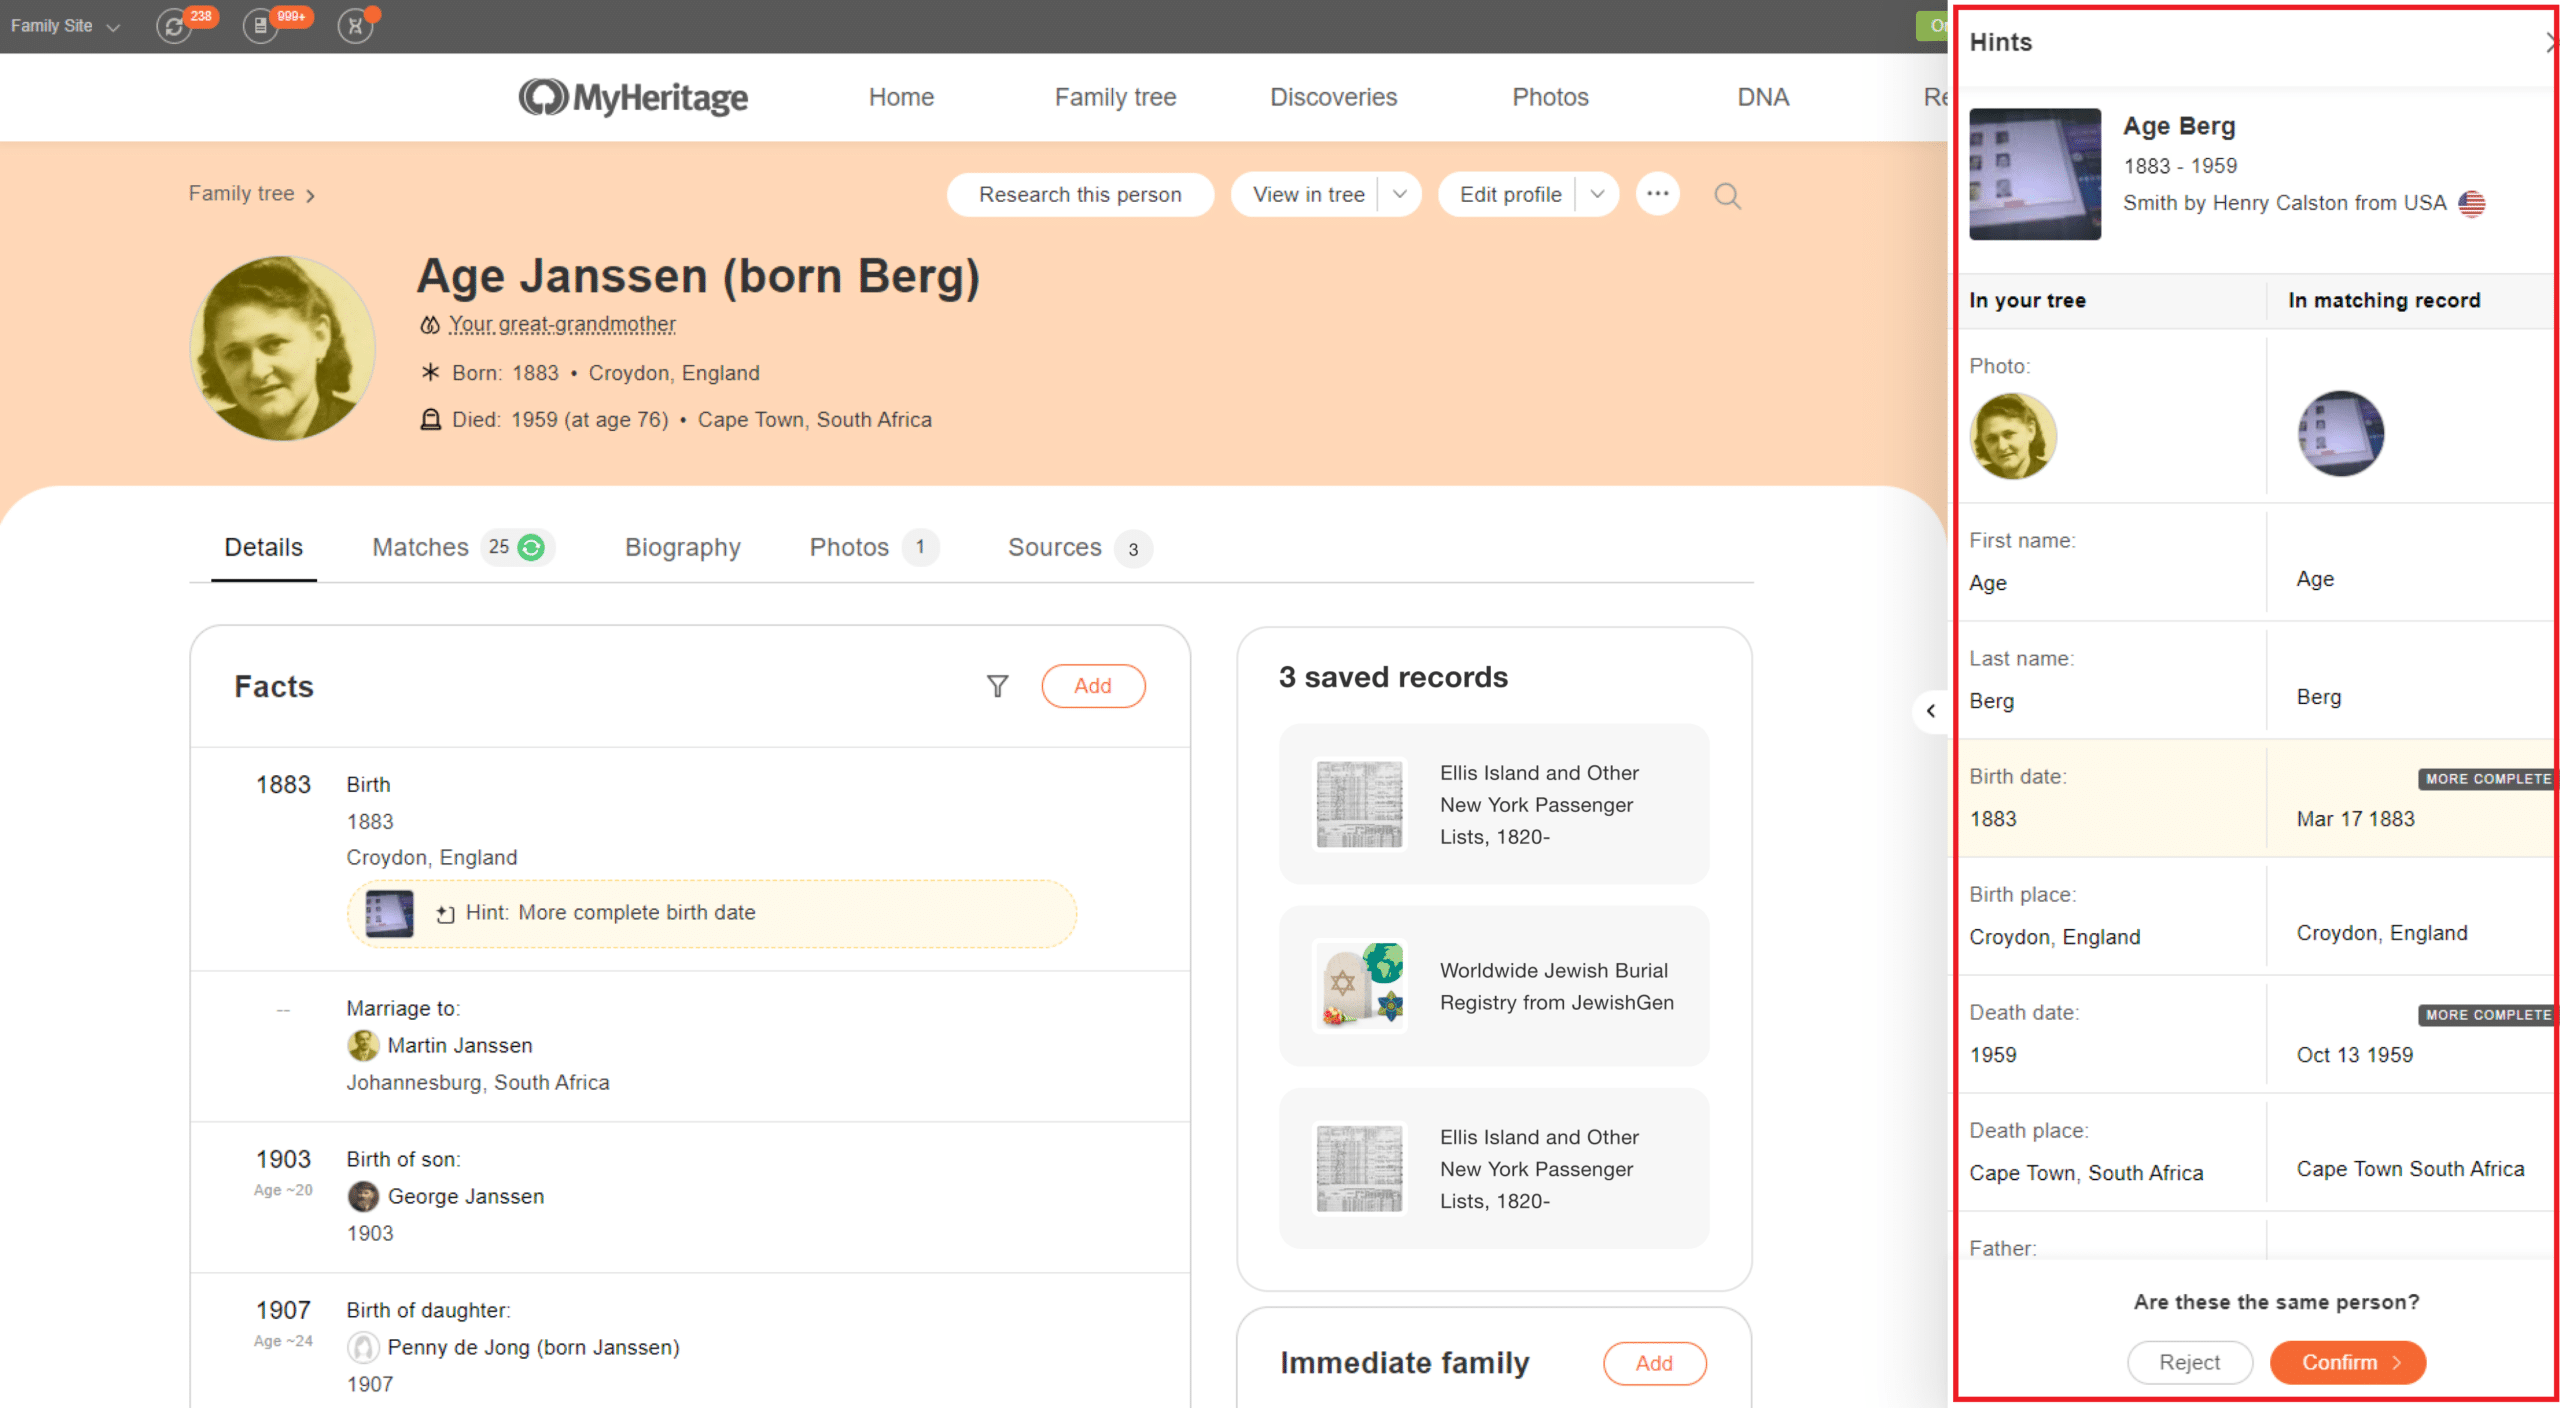
The Hints panel lets you review the information and save it to your tree (click to zoom)
The information from the Hint is highlighted in yellow, but sometimes there is more information in the match that can help enrich your tree. In the example above, the match also provides a more complete death date.
If you consider the match to be correct, click the orange button to confirm it. Once confirmed, you can extract the information and save it to your family tree. At launch, extracting the details and saving them to your tree is done from the traditional “Review match” pages, but very soon we will add the ability to extract the information from Hints within the panel on the right in the profile pages. A subscription is required to view the new information provided by Hints, confirm them, extract the information, and save it to your tree.
The example below shows Hints that can add new relatives to the family tree.
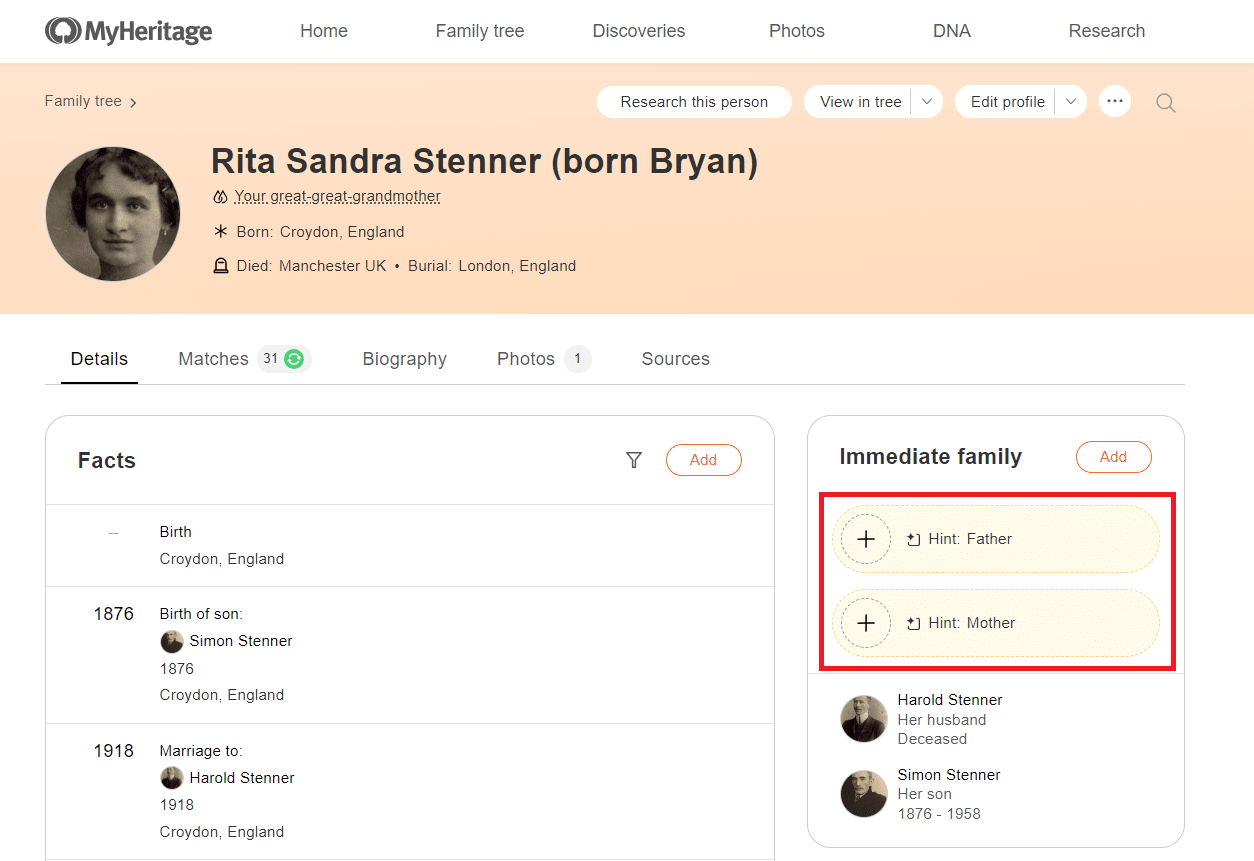
Hints can reveal new relatives to add to the tree (click to zoom)
Click one of the Hints to open the panel and view the new information from the Hint. In this example, the Hint reveals parents, which are missing in the current family tree.
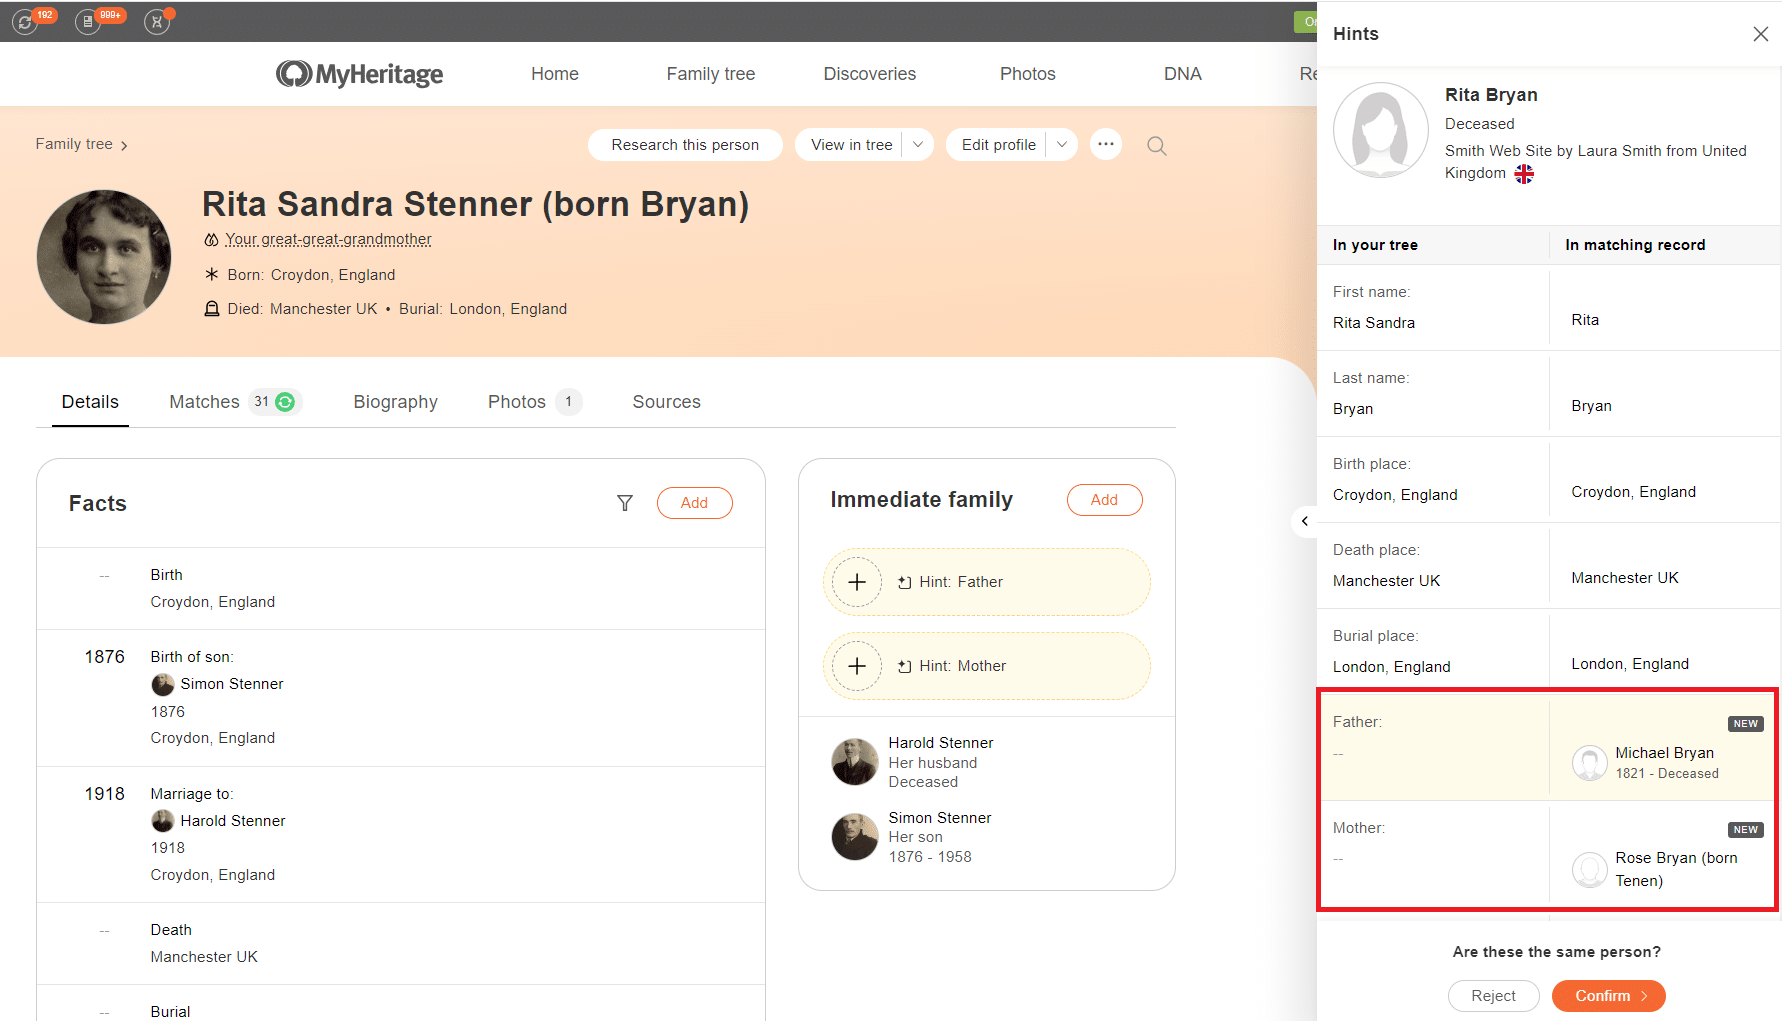
A Hint revealing new relatives (click to zoom)
As you explore the new profile pages and view the profiles for various ancestors and relatives, you’ll quickly see that Hints are very useful, and you can use them without having to leave the page and navigate to another area of the website. If you prefer to see only certain types of Hints, or to turn off Hints altogether, you can do so by clicking the three dots icon at the top of the page, and then clicking “Settings” to open the Settings panel.
Accessing the Settings panel (click to zoom)
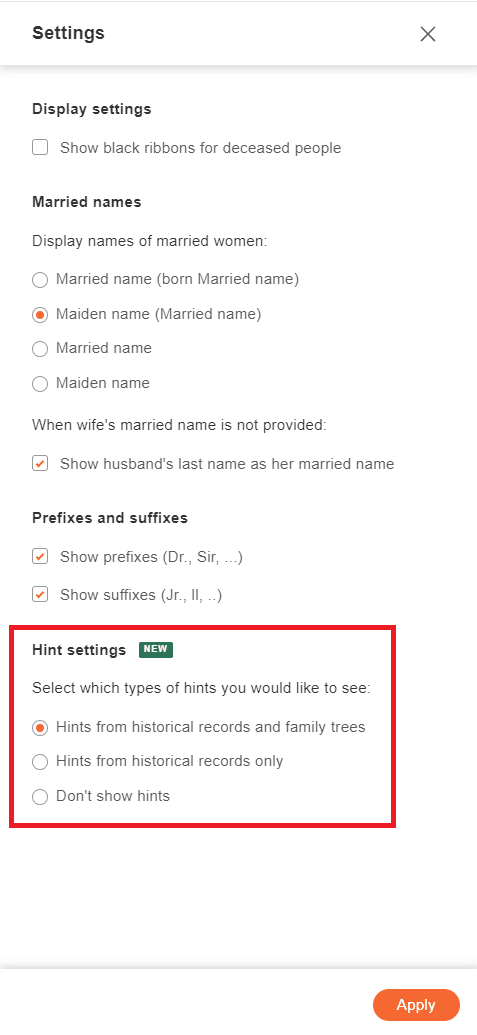
Hint settings within the profile page settings (click to zoom)
Once you’ve selected your preferences, click “Apply”. Any changes you make from the Settings panel will also change the settings in your family tree.
Matches tab
This tab shows all pending Record Matches and Smart Matches™ for this person.
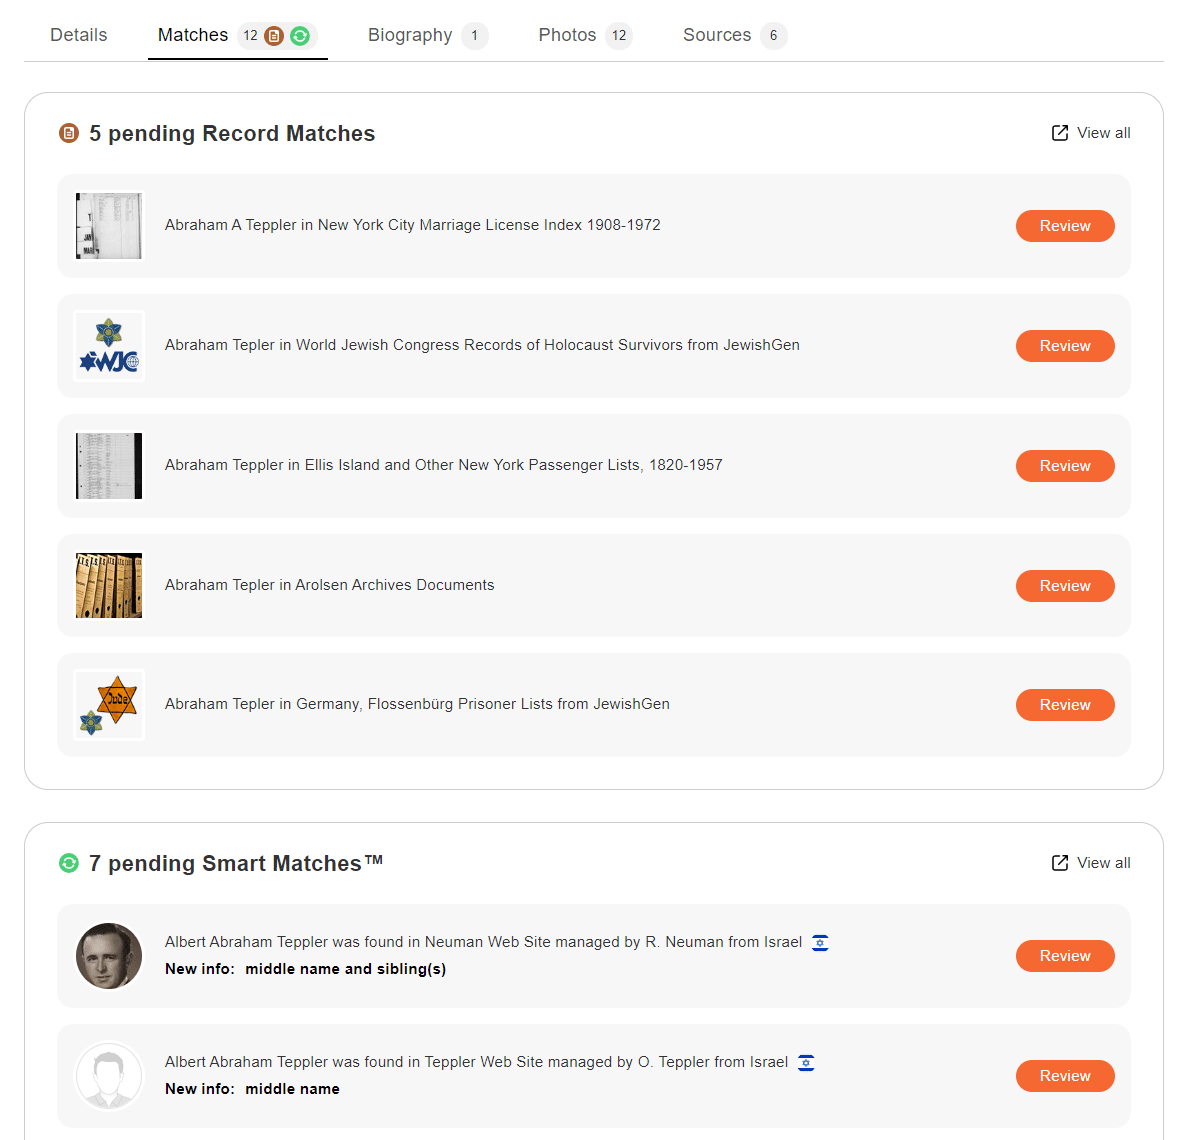
New profile pages — Matches tab (click to zoom)
You can review the matches without having to leave the page. Click “Review” next to any match to open a panel on the right that displays a side-by-side comparison of the details in the profile and the information in the match. If the match seems correct, confirm it by clicking the “Confirm” button. Then, extract the information to your tree.
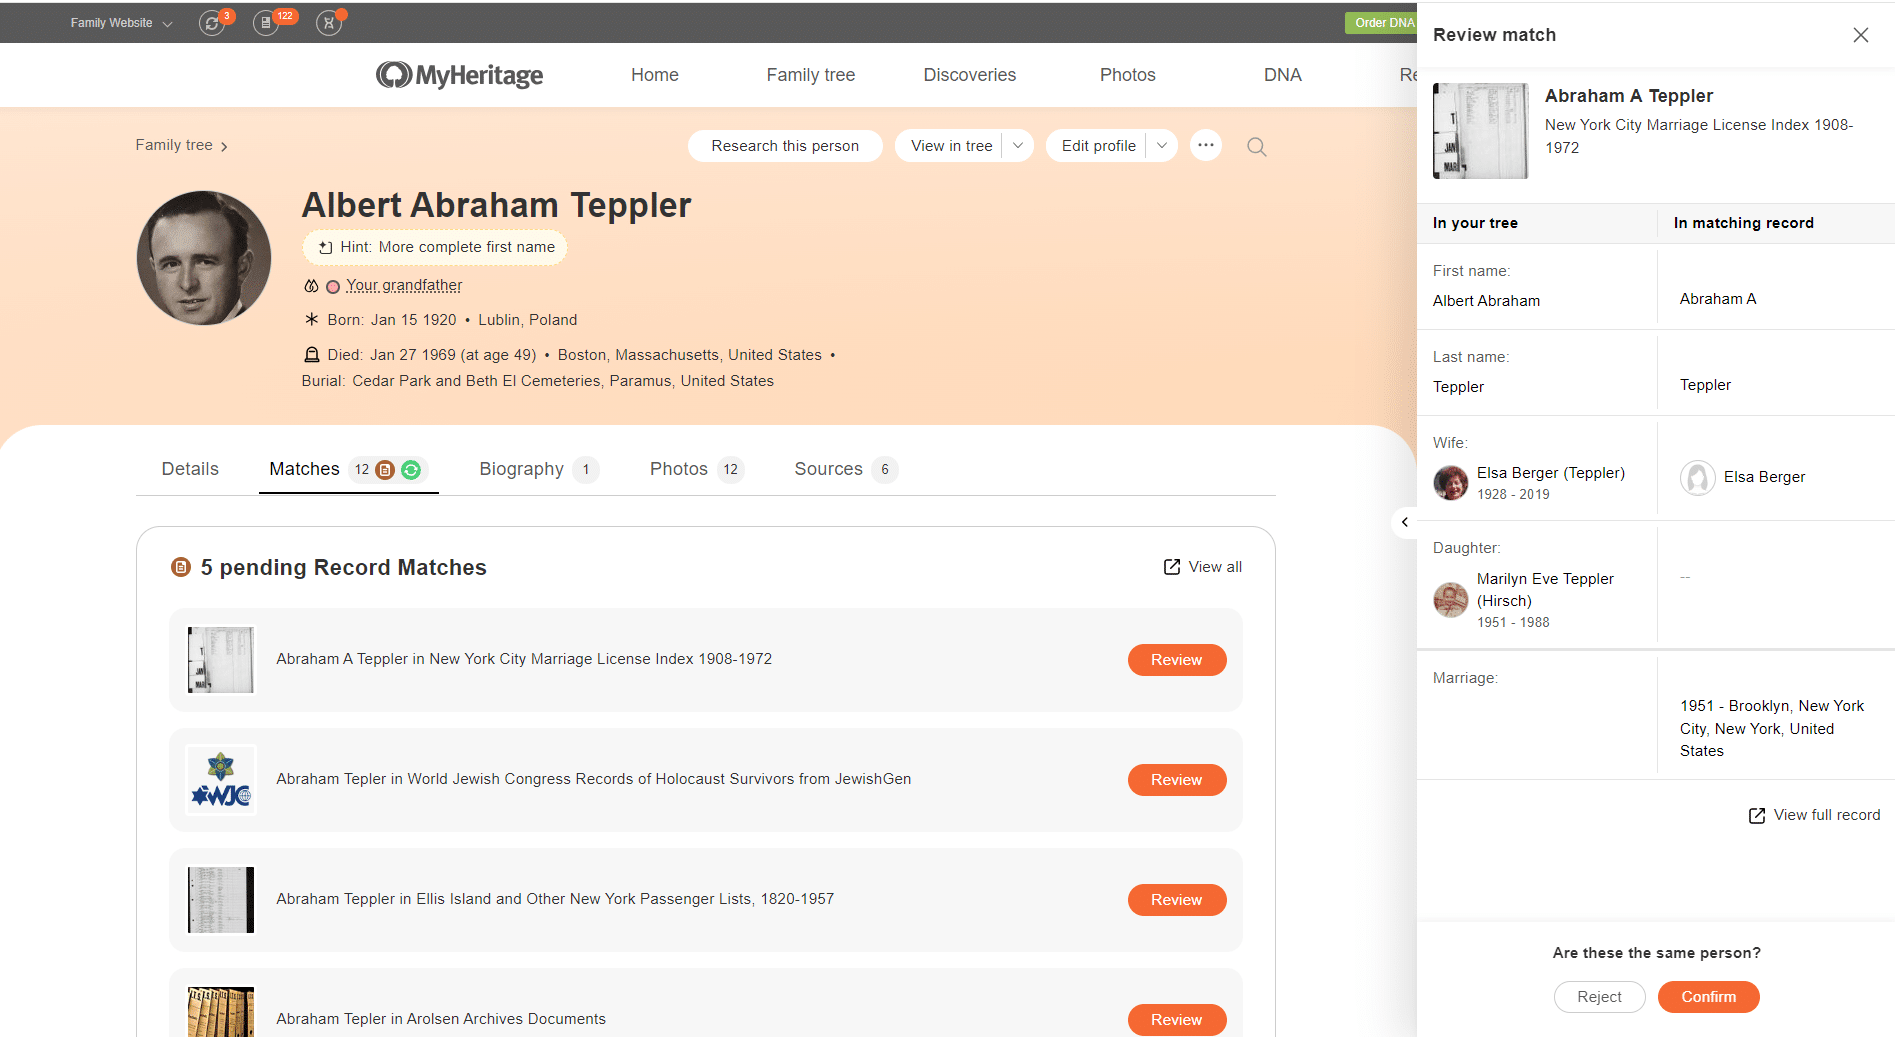
New profile pages — Reviewing a match (click to zoom)
For a wider view of the Review match panel, click the arrow marked below in green.
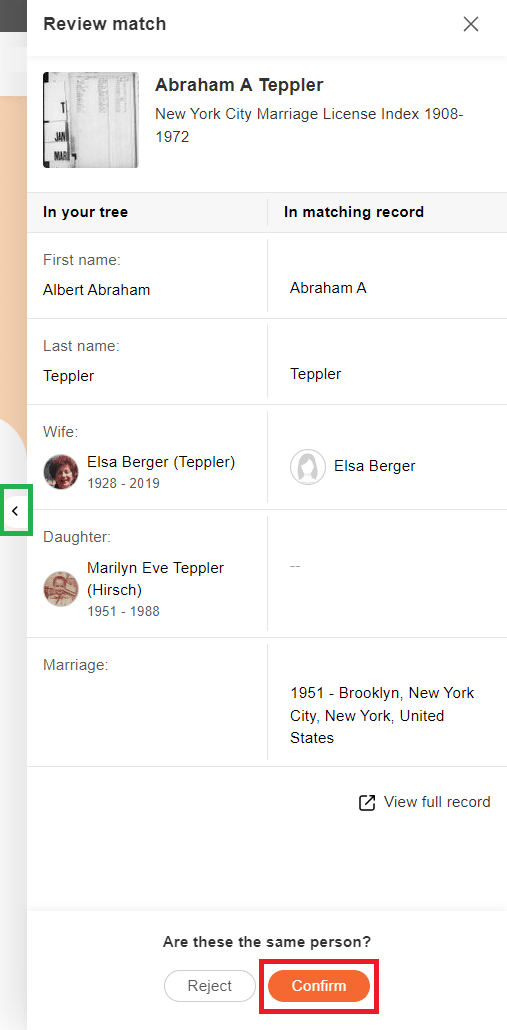
Click the arrow to widen the “Review match” panel (click to zoom)
Biography tab
The Biography tab is the place where the person’s life can be celebrated and commemorated, going beyond dry facts. At the top of the page, with a single click, you can generate an AI Biography™, which will produce a high-quality biography for the individual. The result will be based on information from your family tree, matching family trees and historical records, and enriched using AI to include historical context and surname origins.
If an AI Biography™ has been created for this person, it will be displayed here.
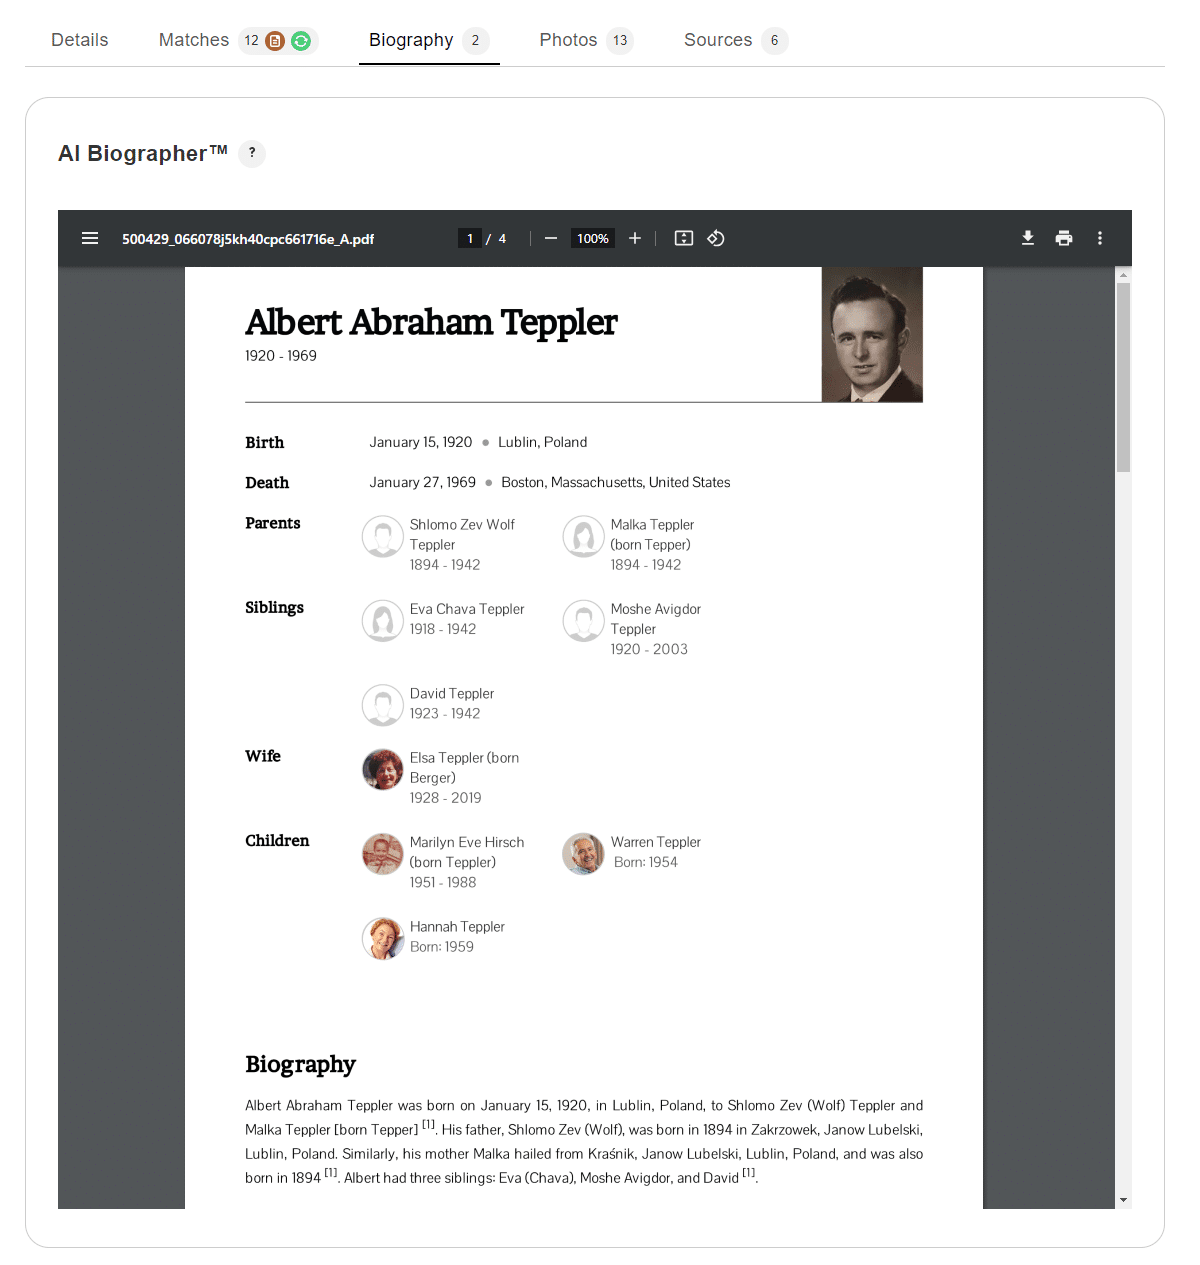
New profile pages — Biography tab with AI Biography™ (click to zoom)
Below that is a Life story section that is automatically generated by MyHeritage based on information about this person in your family tree. It is sparser than an AI Biography™, but it’s useful because it’s always populated. The AI Biography™ and Life story sections are only available for deceased individuals. Further down the page, in the “Biography notes” section, you can add your own notes about the person’s life, to enrich their story even further. This puts you in full control of the text, whereas the AI Biography™ and Life story sections are populated automatically and cannot be edited.
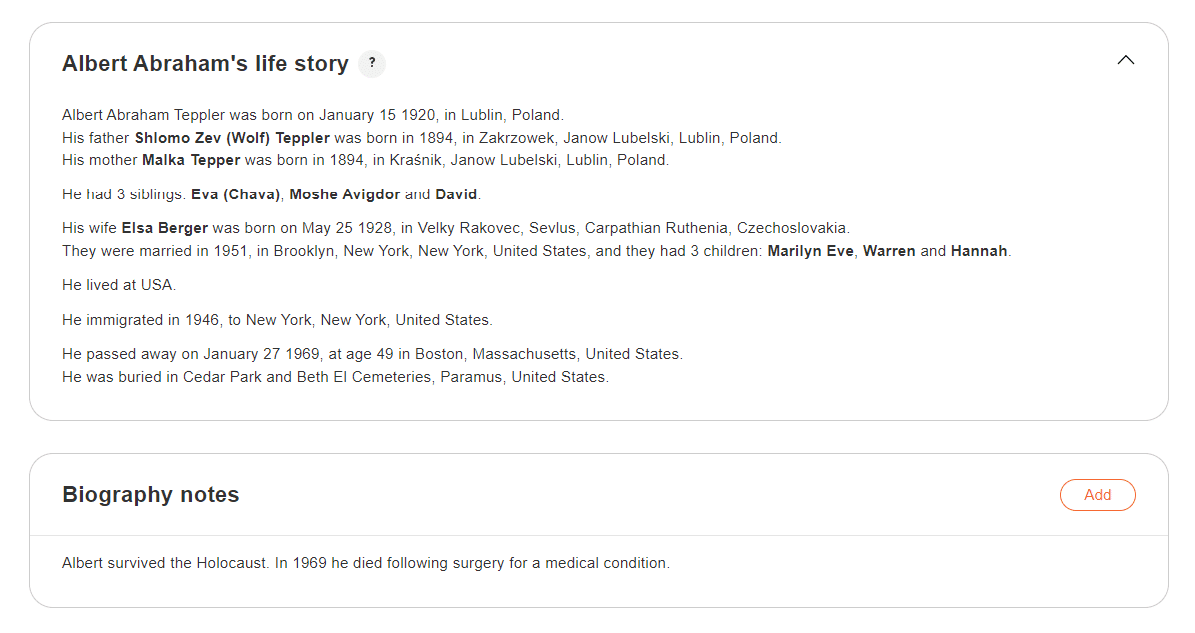
New profile pages — Biography tab (click to zoom)
Photos tab
The Photos tab displays all tagged photos of the individual. Click any photo to open the photo page and view the photo in a larger size. This will also display more details about the photo, for example where and when it was taken, and show additional tagged individuals who appear in it.
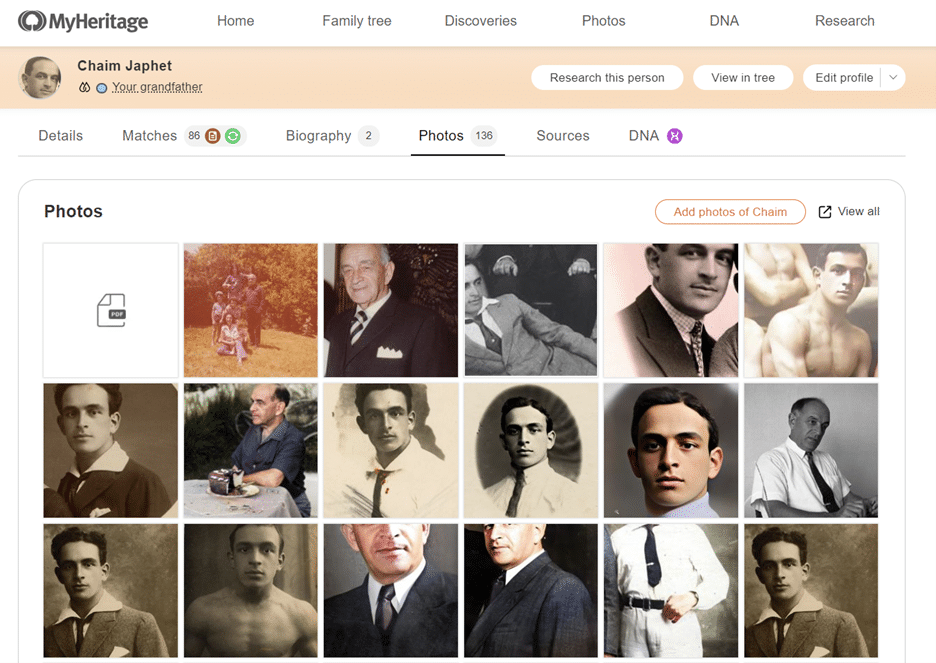
New profile pages — Photos tab (click to zoom)
Click the “Add photos” button in the top-right corner to add more photos in which this person appears.
If you have uploaded photos that you haven’t tagged yet, you can easily tag the individuals who appear in them with Photo Tagger, a free feature on MyHeritage that enables you to tag all the photos of a person in one click. If you haven’t used Photo Tagger before, hover over “Photos” in the main menu and select “Photo Tagger” to get started. You can also visit the My Photos section of your family site to view all photo tagging suggestions.
Sources tab
The Sources tab lists all source citations for details you’ve extracted from your matches and saved to your tree, or added independently. This serves as your bibliography, so you’ll know exactly where all of the information in the profile originated.
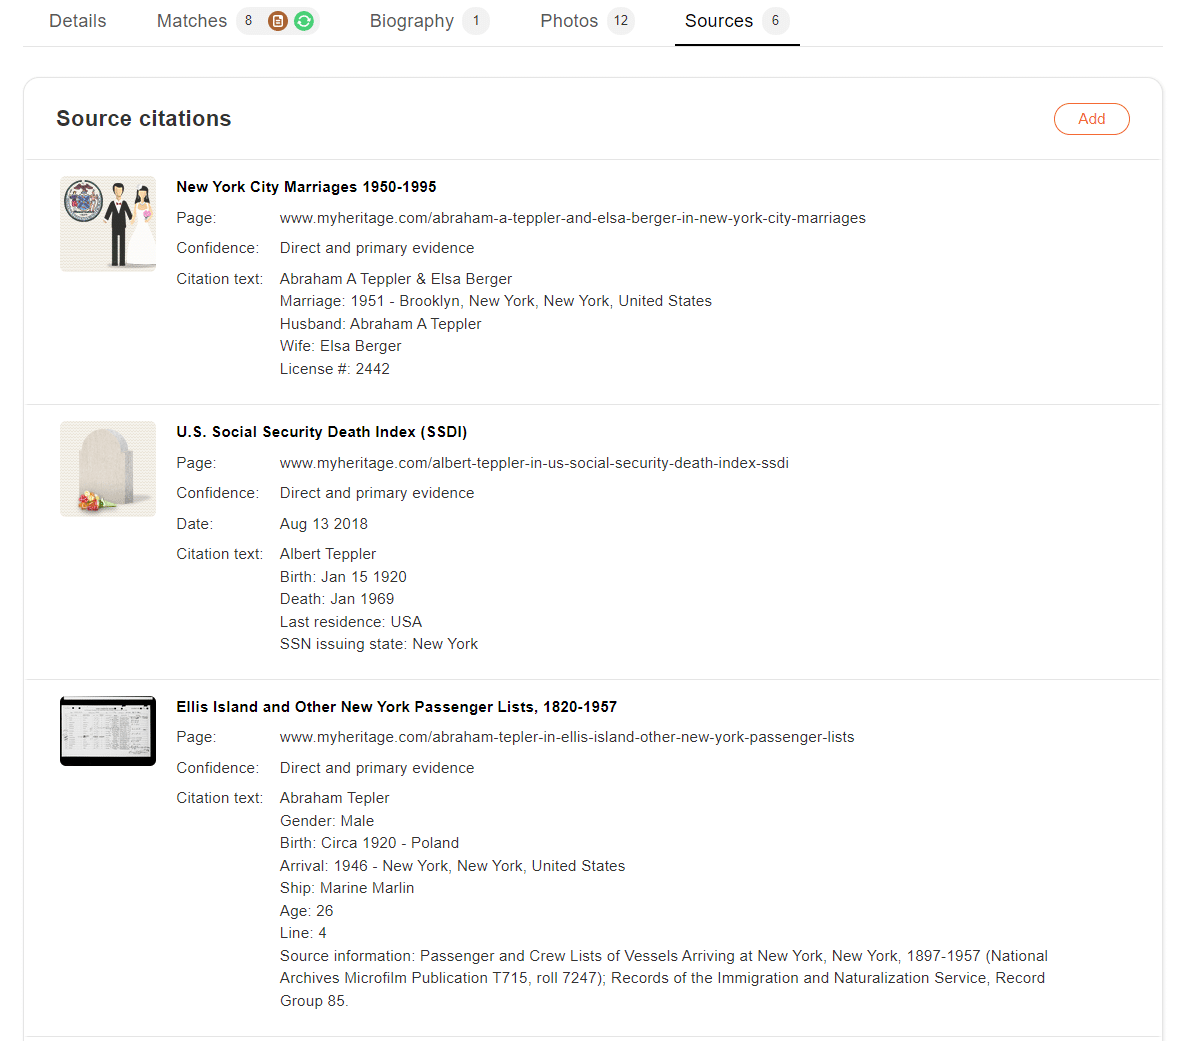
New profile pages — Sources tab (click to zoom)
DNA tab
If you are viewing your own profile on MyHeritage and have already taken a MyHeritage DNA test or uploaded your DNA data to MyHeritage — or if you are viewing the profile of a relative from your family tree who has done this and you are managing their DNA kit, the DNA tab will appear. From this tab, you can manage any DNA kits associated with your account. If any of the DNA kits that you manage have results, you can click to view them.
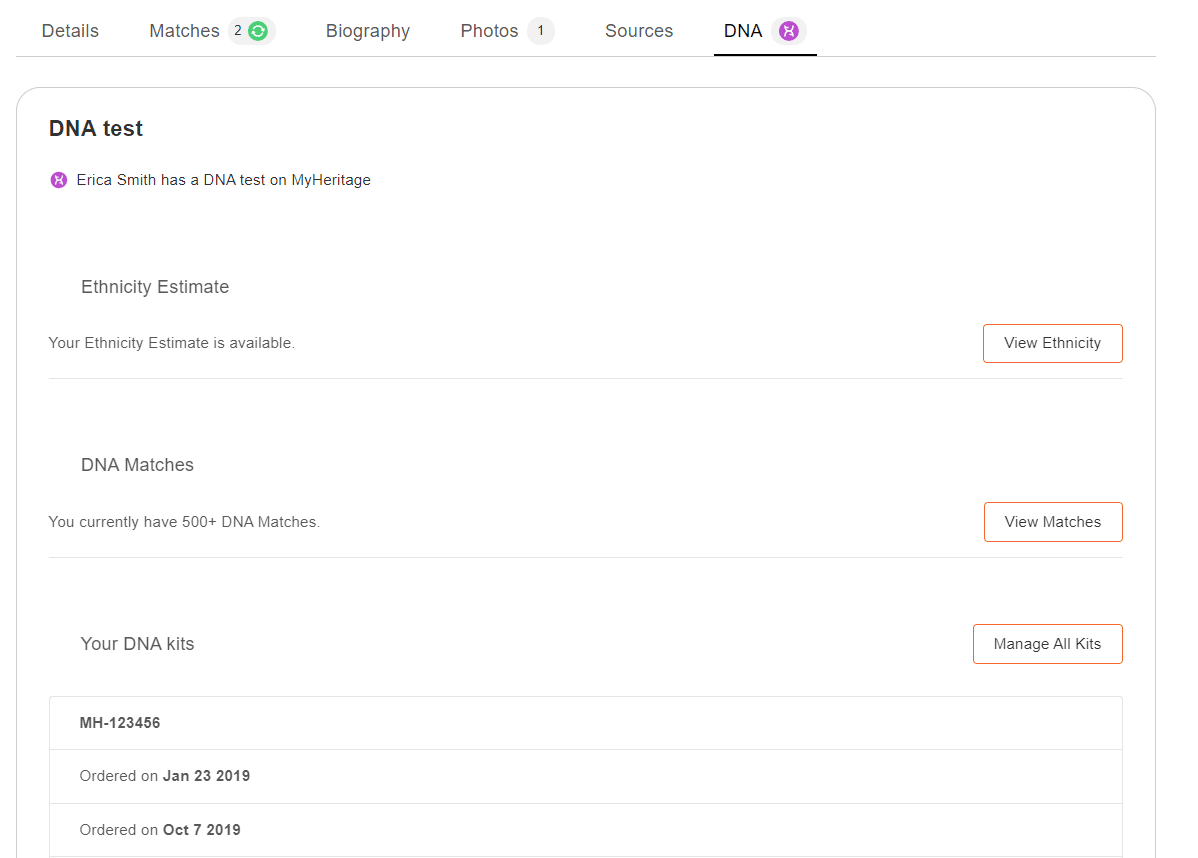
New profile pages — DNA tab (click to zoom)
Profiles of MyHeritage members
The new profile pages also have a mode for displaying information about a member of MyHeritage. You may visit a member’s profile page when they request membership to your family site or when this member is a DNA Match of yours and you want to learn more about them.

Viewing a profile of a MyHeritage member from a DNA Match (click to zoom)
In the mode where the new profile pages display information about a member of MyHeritage, there are no tabs:

New profile pages — MyHeritage member (click to zoom)
When viewing the profile of a MyHeritage member, the top section will tell you their approximate age, what country they’re from, when they joined MyHeritage, and when they last visited the website. If the member is your DNA Match, you may want to contact them. Knowing when they last visited MyHeritage is useful, because if the last visit was recent, there’s a better chance that this member will reply if you contact them. If not, this indicates that this member is inactive and is less likely to be responsive.
The Site memberships section lists all family sites in which this person is a member, ranked in order from most visited to least visited. You can see the name of each site and when they joined it, which can give an indication of other sites that might be of interest to you.
A profile can belong to an individual in your family tree who is also a member of MyHeritage. In that case, all the tabs exist but additional information about the member is displayed in the top section and in the “Site membership” section.
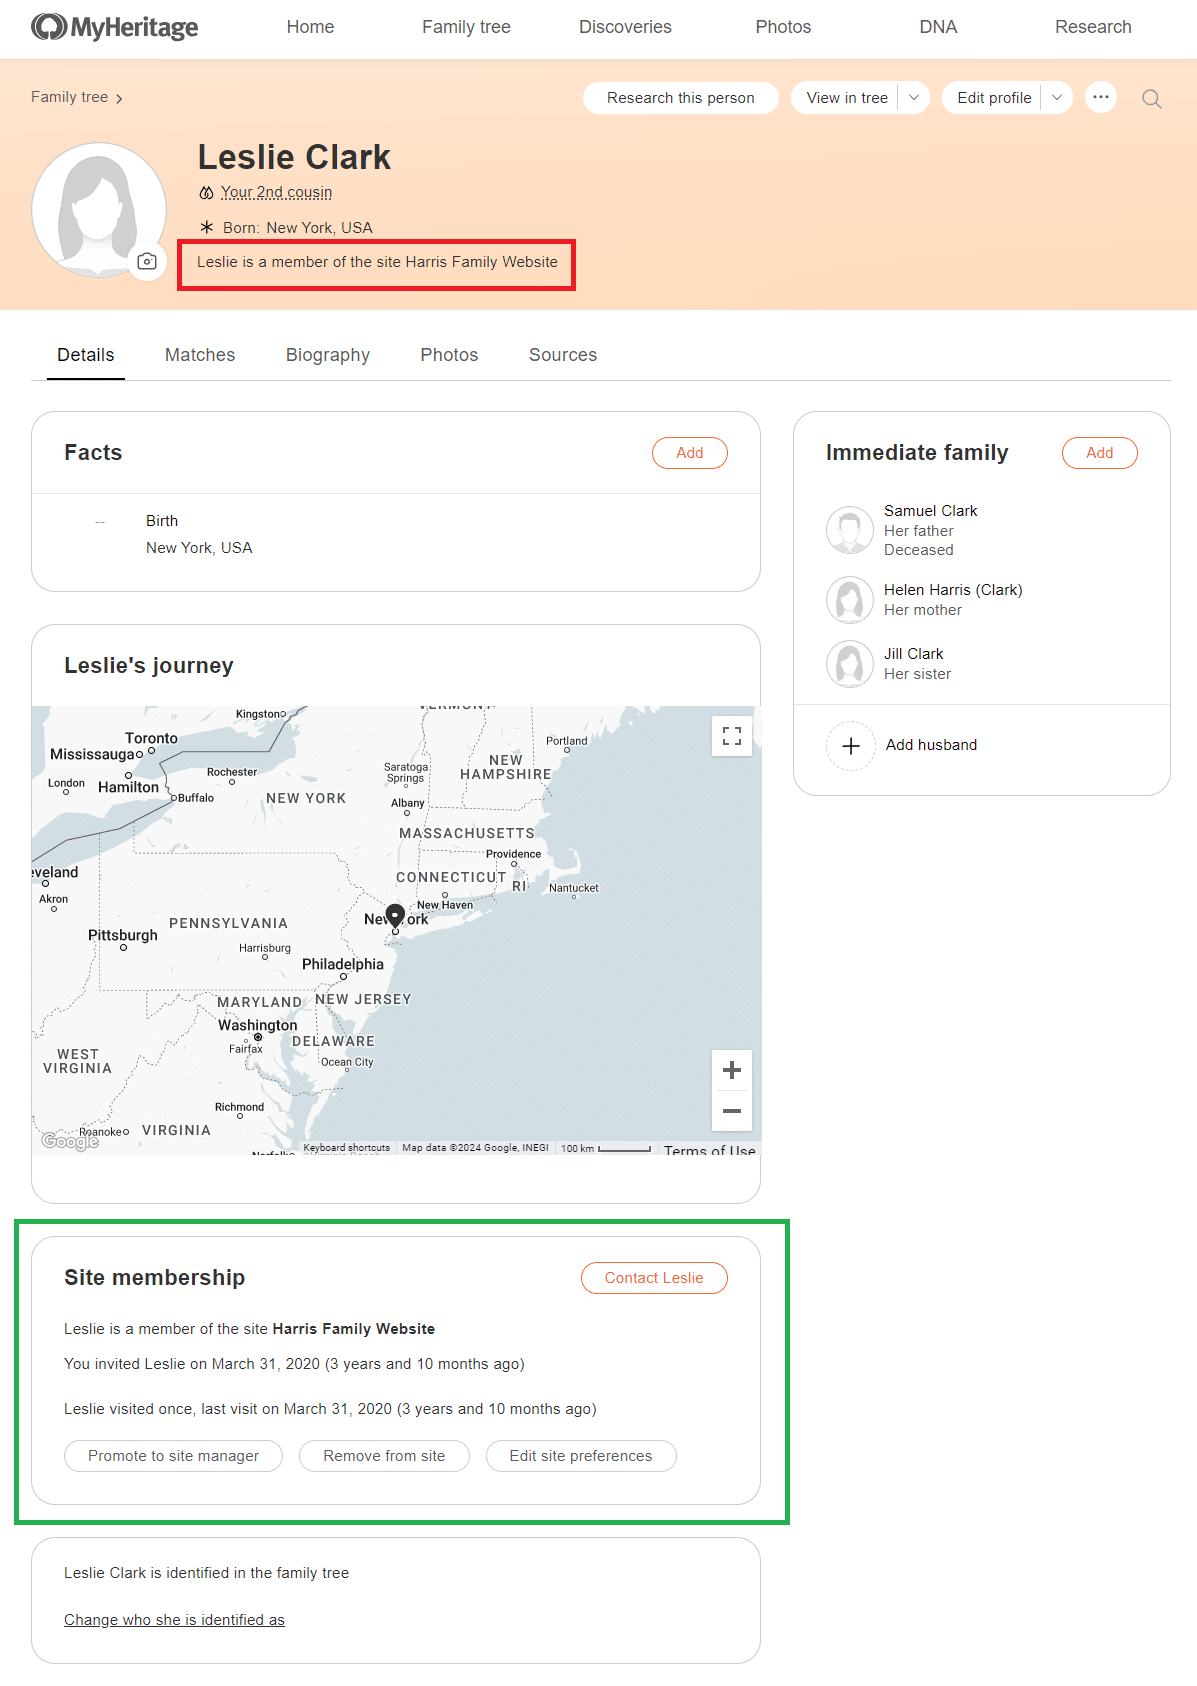
New profile pages — site members who are also individuals in the family tree (click to zoom)
Future enhancements
Additional improvements in the new profile pages are on the way. These include the ability to extract information from matches and save information to your tree without leaving the profile pages. We are adding the new Hints feature directly to the family tree and to the MyHeritage mobile app, and we may add further enhancements, for example the ability to see photo tagging suggestions in the Photos tab.
Summary
At MyHeritage, we are committed to developing products and features that bring value to lovers of family history and help them take their family history research to the next level. The new profile pages follow this commitment. We are delighted to share this update with the genealogy community, and we hope that you find it useful and enjoyable.


Mary
April 9, 2024
Can’t wait to try the new items.