


Bravo – I retract the former comment about deletion. I have played around with it, and am now in process of deleting duplicates of duplicates. Many thanks, for such an easy addition.
New List View for Photos on MyHeritage

We’re happy to introduce the new List view for photos on MyHeritage, designed for convenient editing and sorting of the details in your family photos. This will delight our users who love historical photos, especially those who have hundreds, or thousands of photos uploaded.
Over the past two years, we’ve released innovative new tools to help you gain insights into your family photos. As we’ve become the #1 destination for uploading and enhancing old family photos, with features such as MyHeritage In Color™, Photo Enhancer, Photo Repair and Deep Nostalgia™, users have been uploading millions of photos to our platform, and we wanted to make it easier to organize, document and tag them.
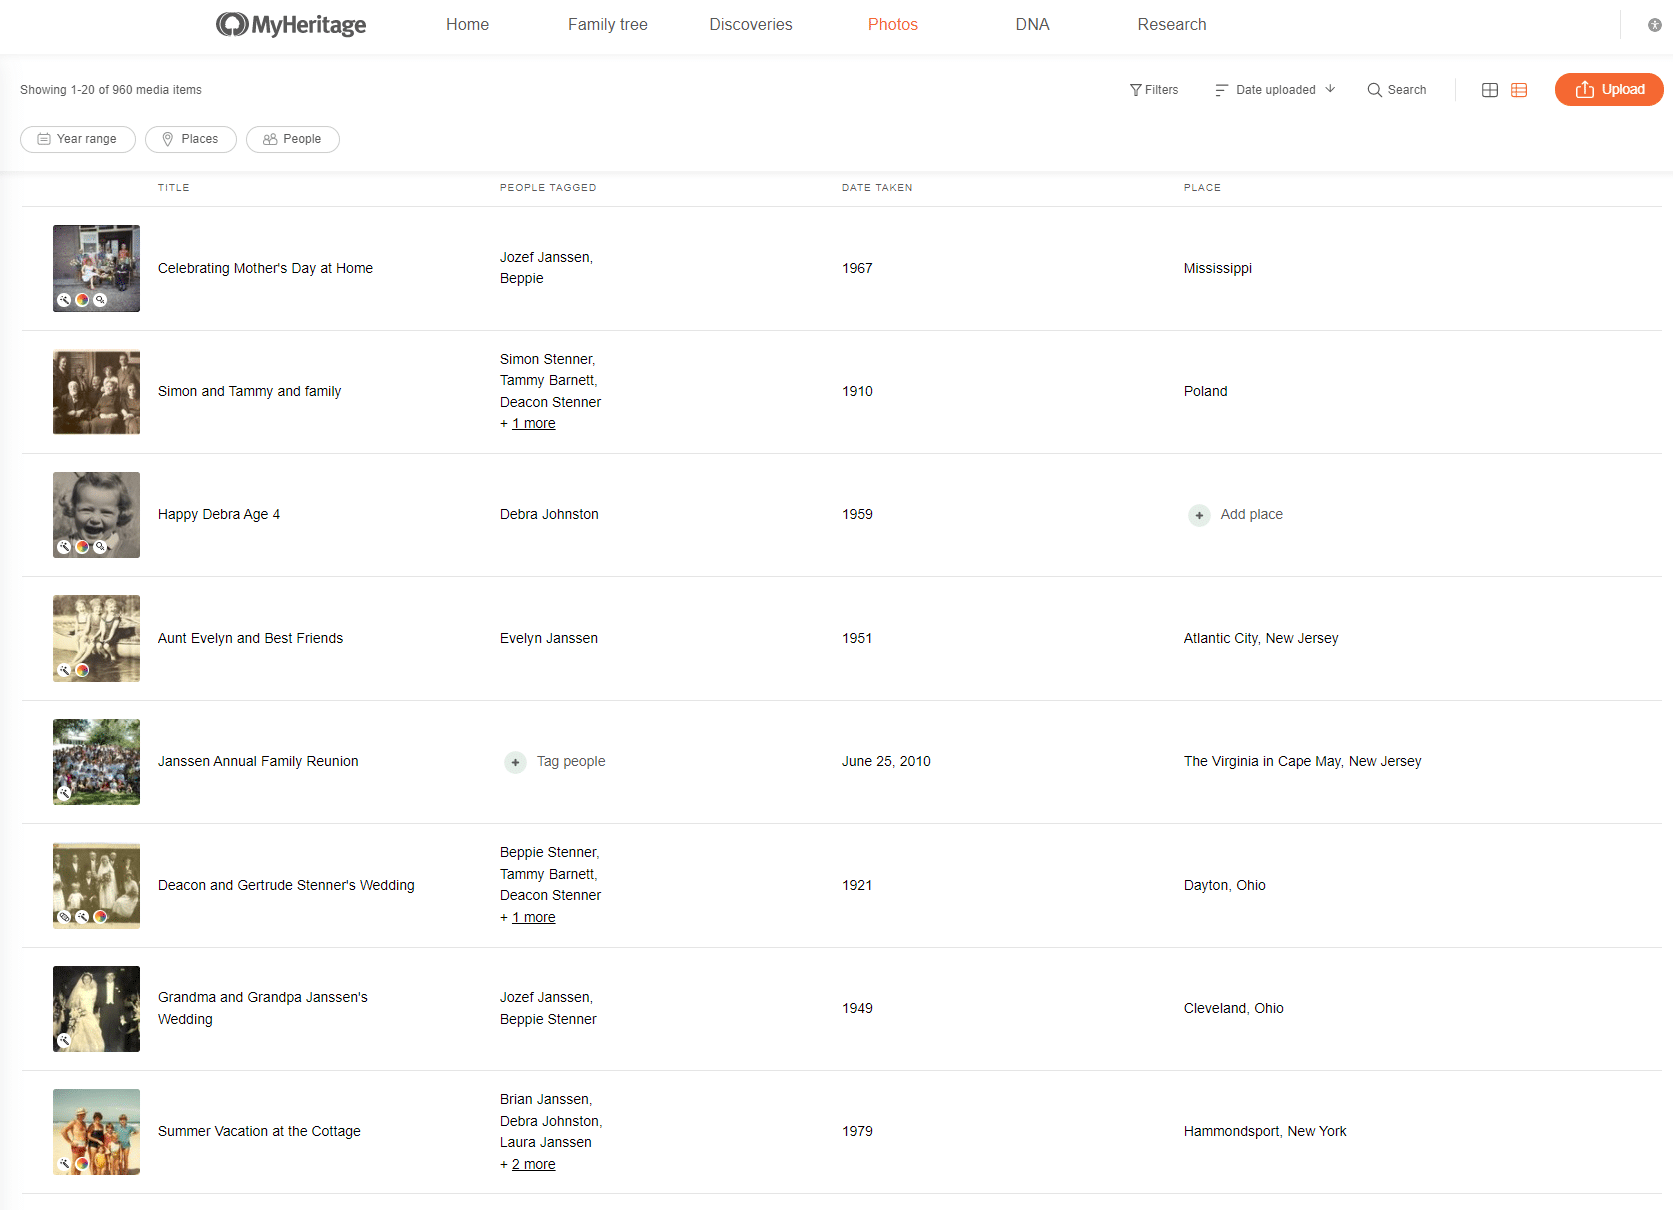
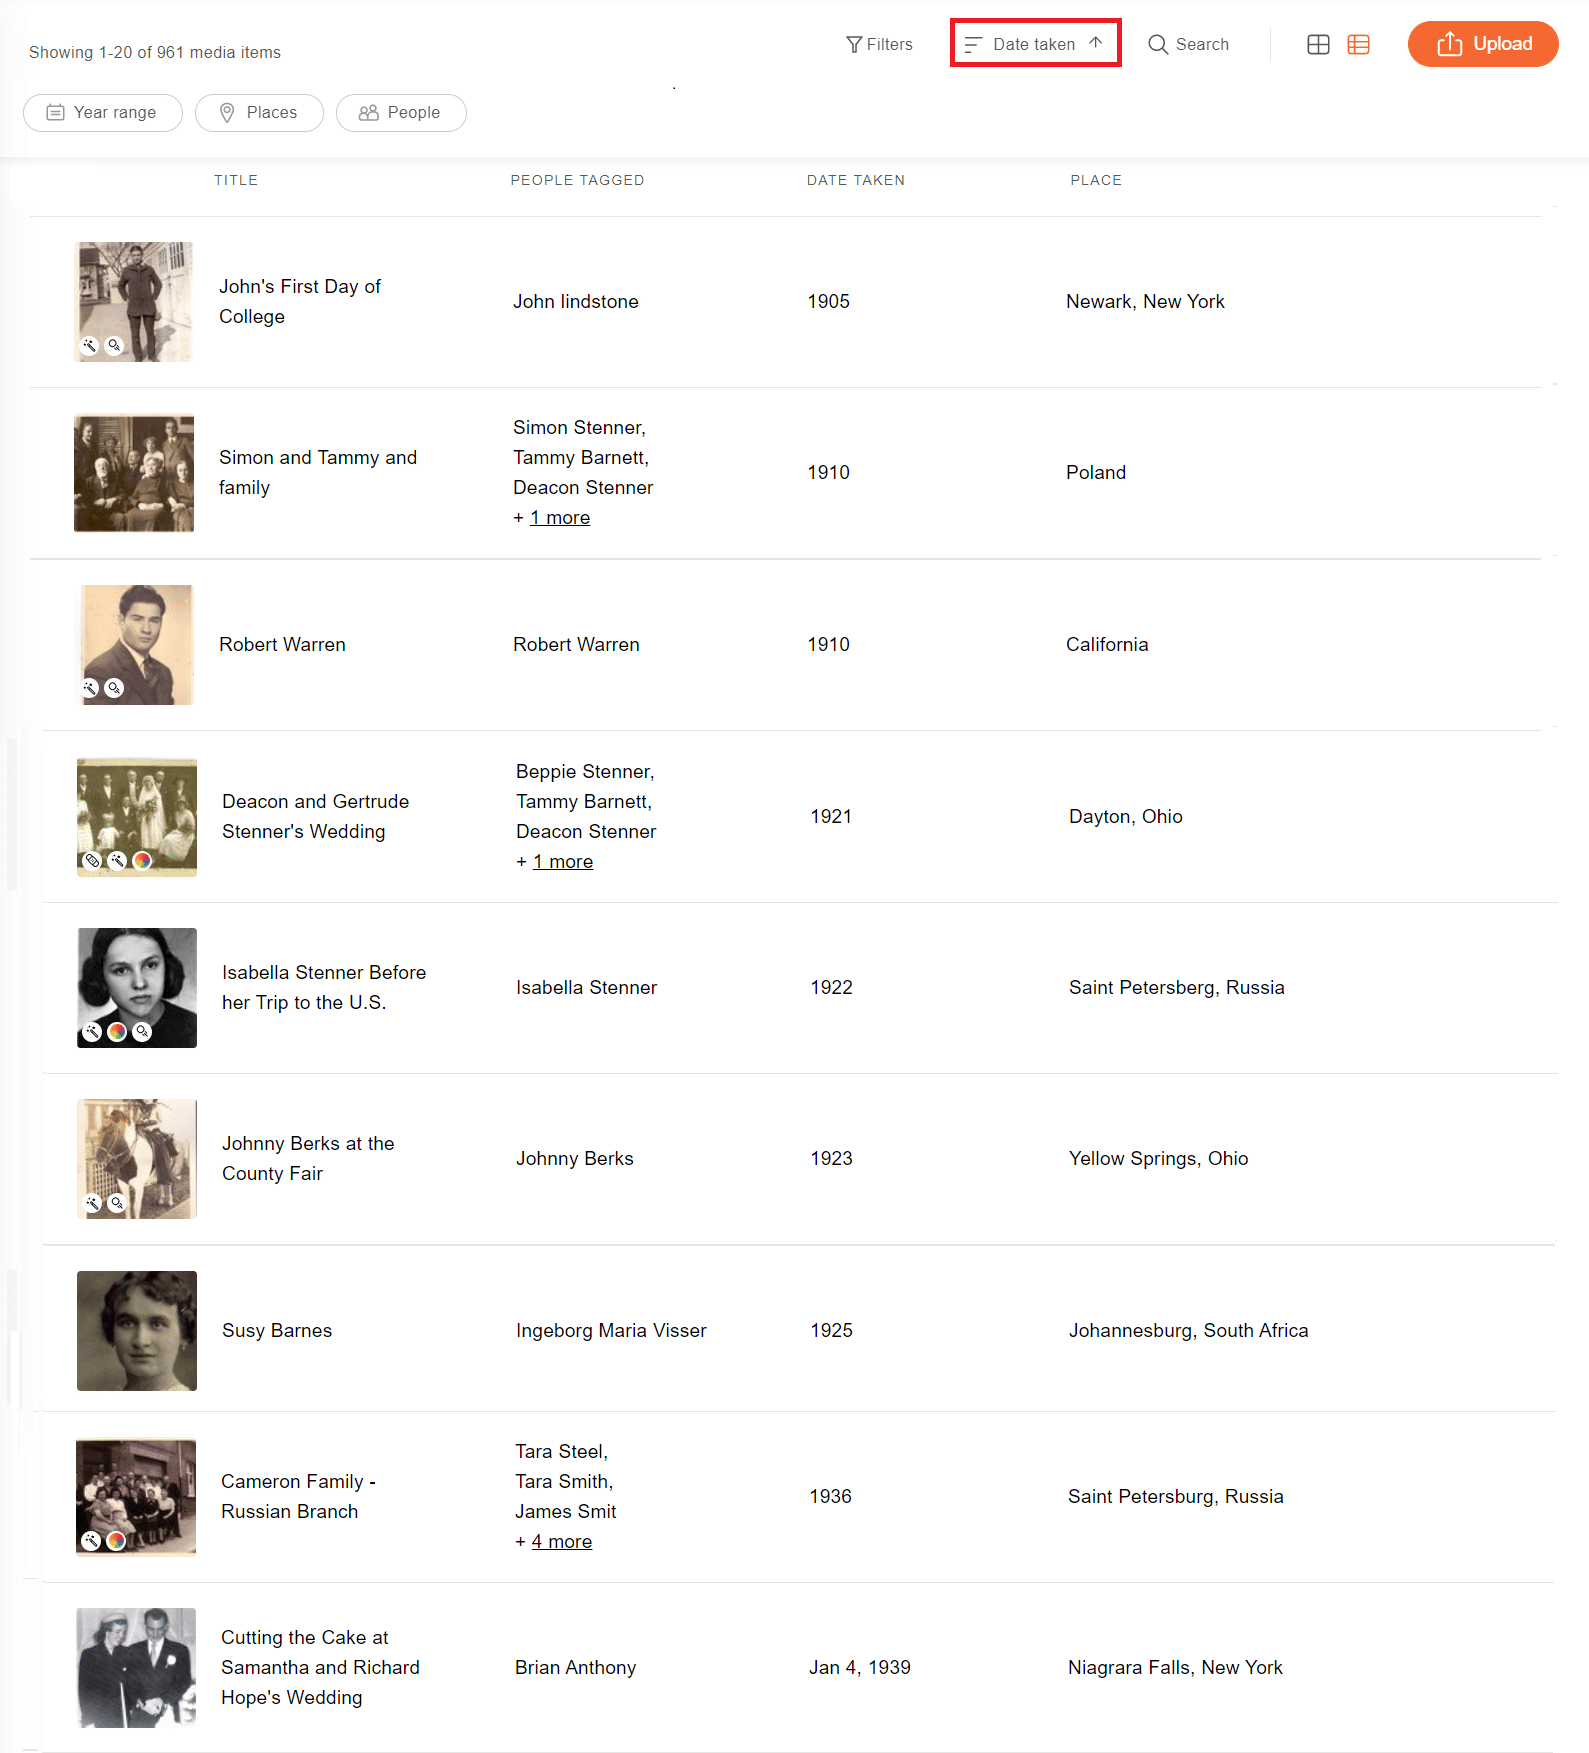
The new List view allows you to see thumbnails of your photos along with the meta-data relating to each photo, including the title, the people tagged in the photo, and the date and place where the photo was taken. Missing information can then be entered inline, easily.
The New List View (Click to zoom)
List view and Grid view
Visit your photos by logging on to MyHeritage and click on ‘Photos’ in the navigation menu. Next to the button to upload new photos, you’ll see a toggle between the new List view and the existing Grid view.

Toggling between the photo views. List view is on the right (Click to zoom)
The List view is a new display mode, complementing the current Grid view. Grid view is more compact, showing more photos on the screen, but without their details. It’s useful when you want to skim through your photos focusing on the visuals. In contrast, the new List view shows less photos per page, but includes their main information, which is very useful when you want to review your photos according to their meta-data, for example, based on where or when they were taken, or the people who appear in them.

Grid view for the same set of photos (Click to zoom)
Preserving family photos
Photos are among a family’s most treasured possessions. They store the memories and capture the essence of people and places, serving as a time machine to our family’s past. We’re lucky if we have family photos left to us by our ancestors, but many of those photos are often left undocumented, with little or no information about who is featured in them, and when and where they were taken. It is up to us to find and treasure our family’s photos, upload them for digital safekeeping, and document as much information as we can about them through investigation and research. This is how we can leave a rich legacy for future generations.
Having all your family photos preserved in one place is invaluable. When you upload and organize your historical photos on MyHeritage, it’s easy to preserve the historical information in the photos, and to share your treasured family memories with your relatives.
The first step is to upload your photos to MyHeritage. For more information on this, watch this how–to video. You can also use the free MyHeritage mobile app for iOS and Android.
After uploading photos to MyHeritage, the next step is to document them: Tag the people who appear in them, and add dates, places, and titles. With the new List view, you can easily spot missing information for your photos and enter it. There are new filtering and sorting options that make it a pleasure to work with your photos.
Let’s dive into the new layout!
Exploring List view
List view displays all your photos in a table.
Photos that have been enhanced, repaired, colorized, and/or animated will appear with corresponding symbols on the photo thumbnail. Information displayed for each photo includes its title, the people tagged in the photo, the date the photo was taken, and the place the photo was taken.

Photo information displayed in List view (Click to zoom)
To view a photo in a larger size, via the single photo page, hover over the photo’s line and click “View” on the right. You can also click on the thumbnail of the photo to get the same result.
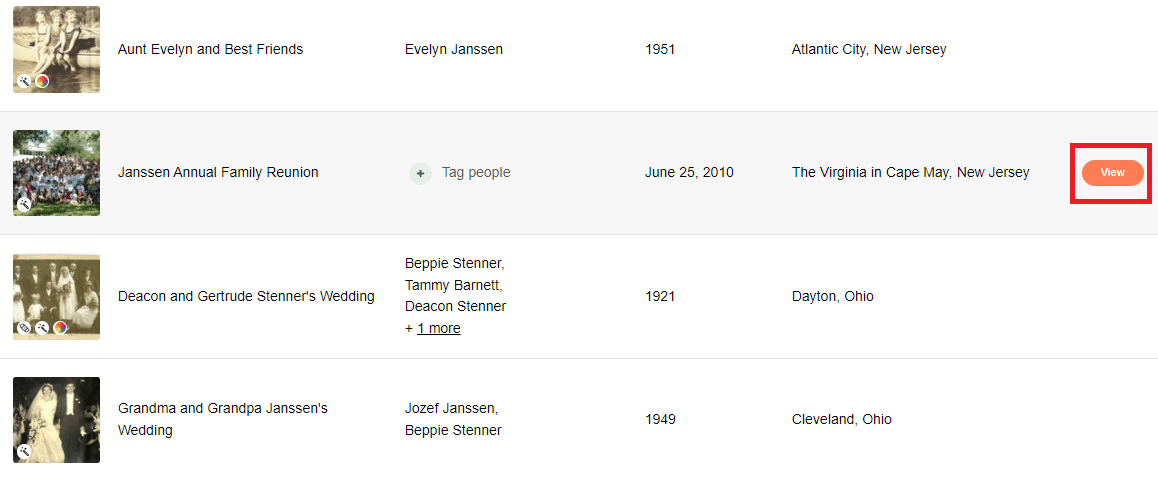
Click “View” to open the single photo page (Click to zoom)
The photo will be opened in a new tab, allowing you continuous and distraction-free work on the main photo list page. From there, you can see more information about the photo and perform other actions on the photo, such as repairing, enhancing, colorizing, or animating it, and share it on social media.
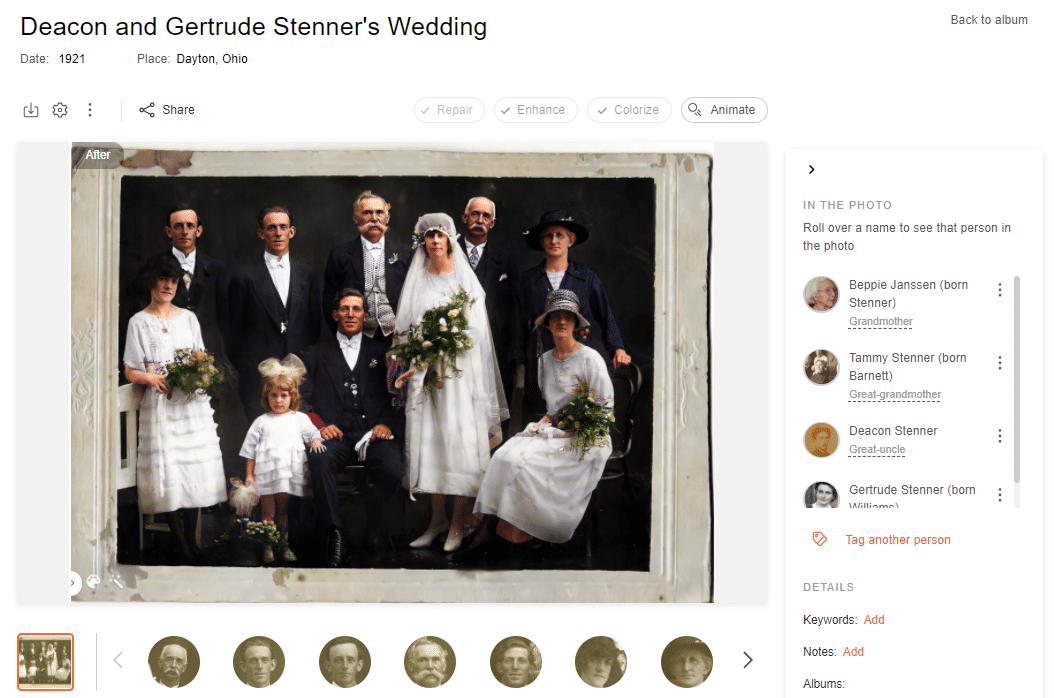
Single photo page opened in a new tab (Click to zoom)
List view makes it easy for you to add any missing information. Simply click any field to edit its contents. Empty fields contain an “Add title,” “Tag people,” “Add date,” or “Add place” button. This is a major improvement compared to the Grid view, where meta-data was not displayed, and you had to open each photo individually to see if anything was missing and add new information.

Empty fields beckon you to fill them up! (Click to zoom)
The “Add title,” “Add date,” and “Add place” options can be edited in-place. Simply click the button, enter the information, and click “Save.”

Entering a photo’s title (Click to zoom)
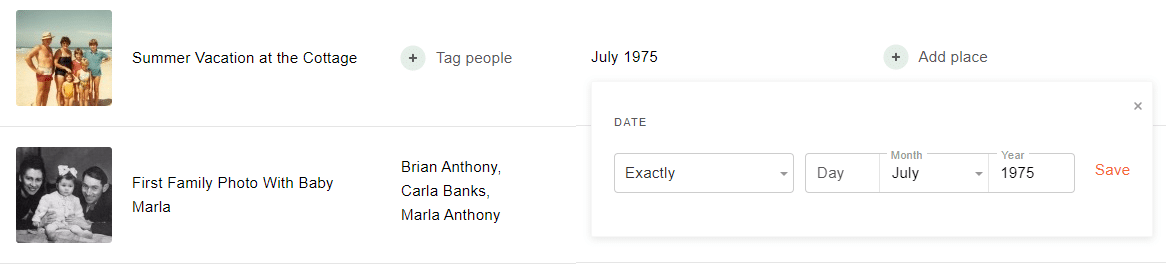
Entering a photo’s date (Click to zoom)
Date entry is flexible, and many options are supported. You can add a full date, a partial date (like a year), or a date range.
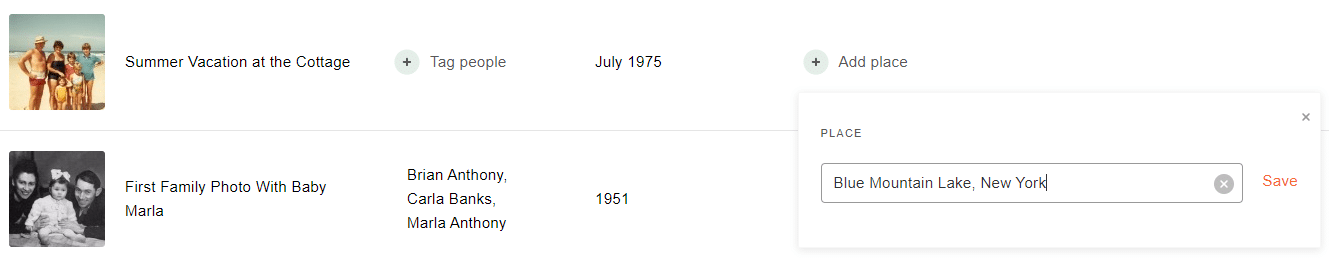
Entering a photo’s place (Click to zoom)
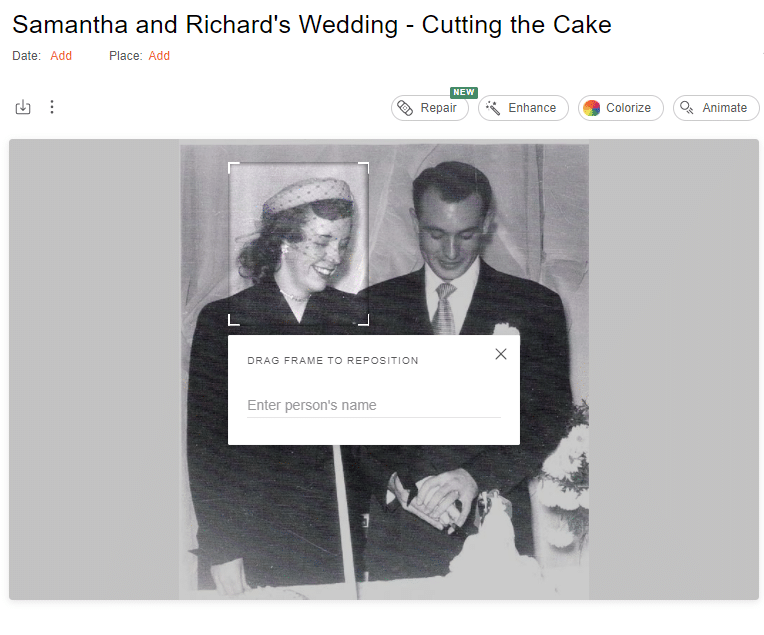
The “Tag people” button will take you to the individual photo page, opened in a new tab, where you can tag the people who appear in the photo.
You can select multiple photos to download or delete by clicking the circle that appears to the left of each photo when you hover over it with your mouse, and then selecting any additional photos you’d like to perform this action on. We plan on allowing you to set the date or place for multiple photos this way, but this will be supported in the next update.
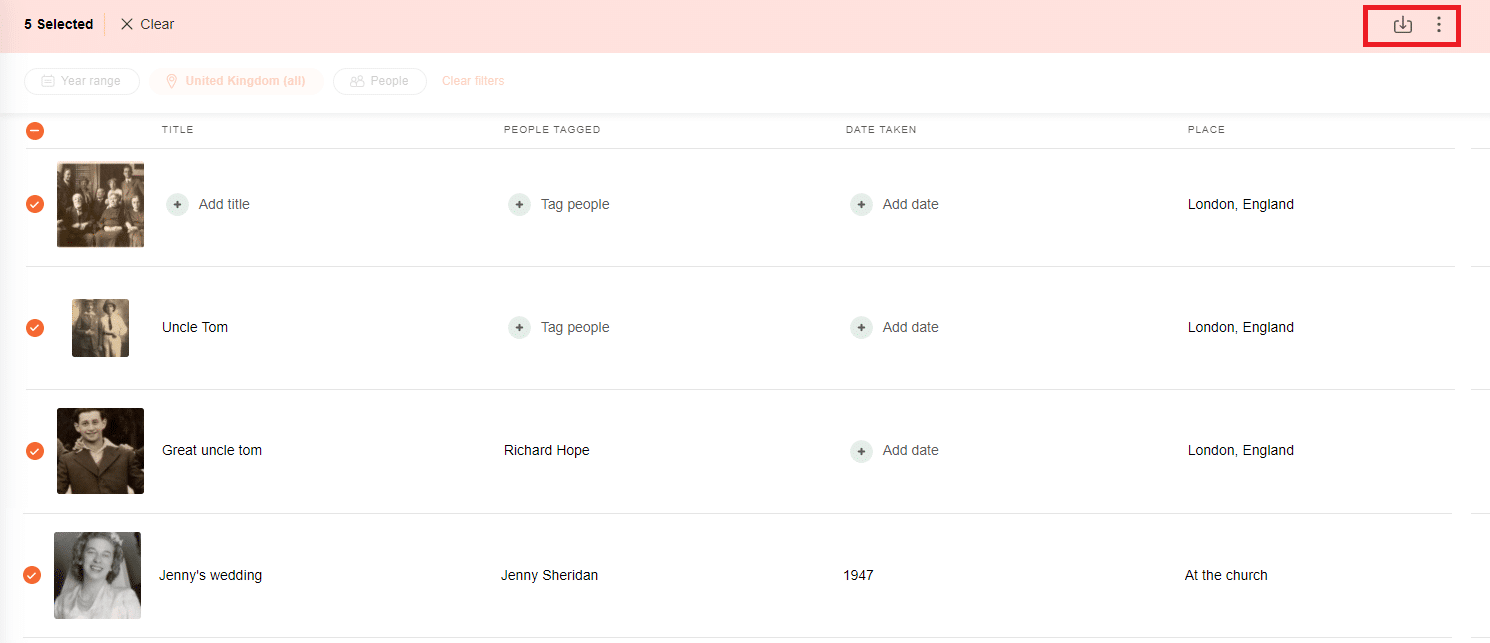
Selecting multiple photos for downloading or deleting them (Click to zoom)
Sorting and filtering
Photos in the grid view are always displayed with the photos added most recently at the top, and there are currently no sorting or filtering options available.
By contrast, on the new List view, you can filter your photos according to 3 new filters: year range, place taken, or people in the photo. This is very helpful when you have a lot of photos.
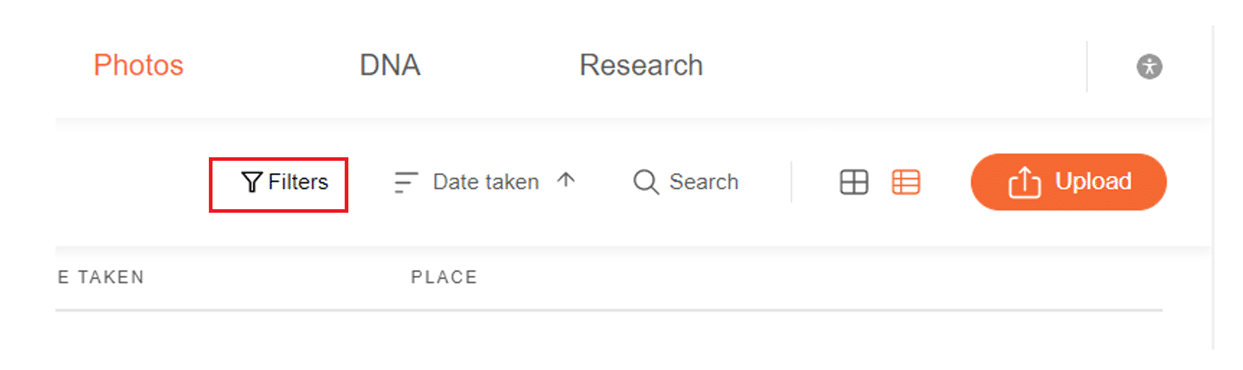
Accessing the filters in List view
The “Year range” filter offers decades for you to choose from, or you can enter a custom range. You can also filter photos by “Missing dates” in order to bring up the list of all your photos that haven’t been dated. You can then easily add this information directly from the list view.
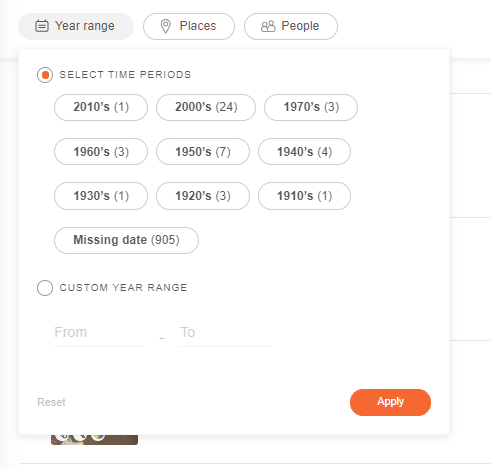
Filtering by “Year range”
Filtering by “Places” will bring up all the places you have in your family photos. Click on the arrows next to a location to drill down further.
You can find the photos without place information, by selecting the “Missing places” filter. And, of course, you can then fill in any missing places directly from the List view.
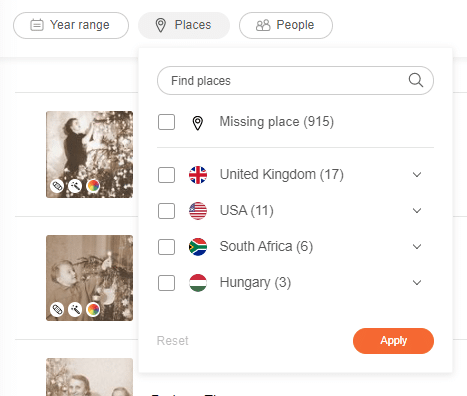
Filtering by “Places”
Filter your photos by “People” to see all photos where those people appear. If you select more than one person, then we will show all photos that feature either one of them.
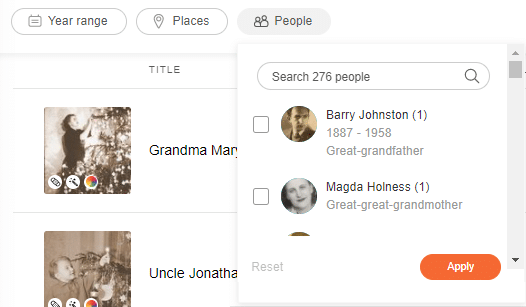
Filtering by “People”
If you’d rather see only photos that feature all those people together (for example, if you would like to see photos of yourself and your grandmother, together), select the “Show photos of these people together” option.
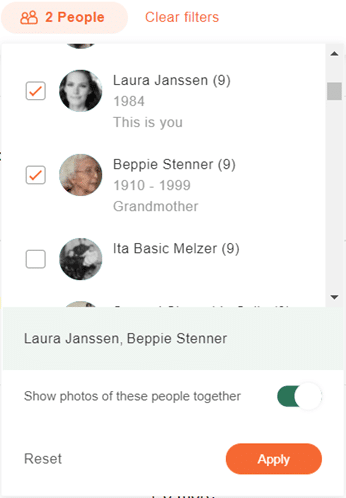
Filtering by “People”
The results will show all photos that all selected people are tagged in.

Example: photos in which MyHeritage’s founder Gilad appears together with his grandfather Chaim (Click to zoom)
Select “Untagged photos” to concentrate your efforts on untagged photos.
You can choose any combination of filters to display your choice of photos.
Click “Clear filters” when you want to clear the selection.
![]()
You can also sort your photos (on top of the filters) based on the date the photo was uploaded, when the photo was taken, the title, or the place.
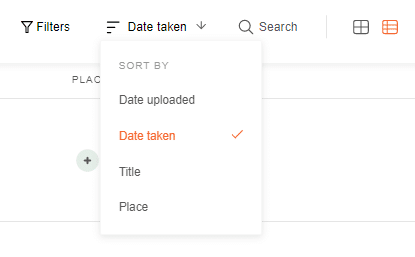
Clicking on the arrow next to the sorting criteria will reverse the order of the list. For example, this sorting option shows photos by date taken in ascending order, so the oldest photos are displayed first.
Sorting photos by date taken in ascending order (Click to zoom)
Searching photos
The search option is similar to the search in the Grid view, but the results will now be displayed in the new List view. The search option covers photo titles and the names of people tagged.

Here is an example of a search for all photos with the word “wedding” in them:
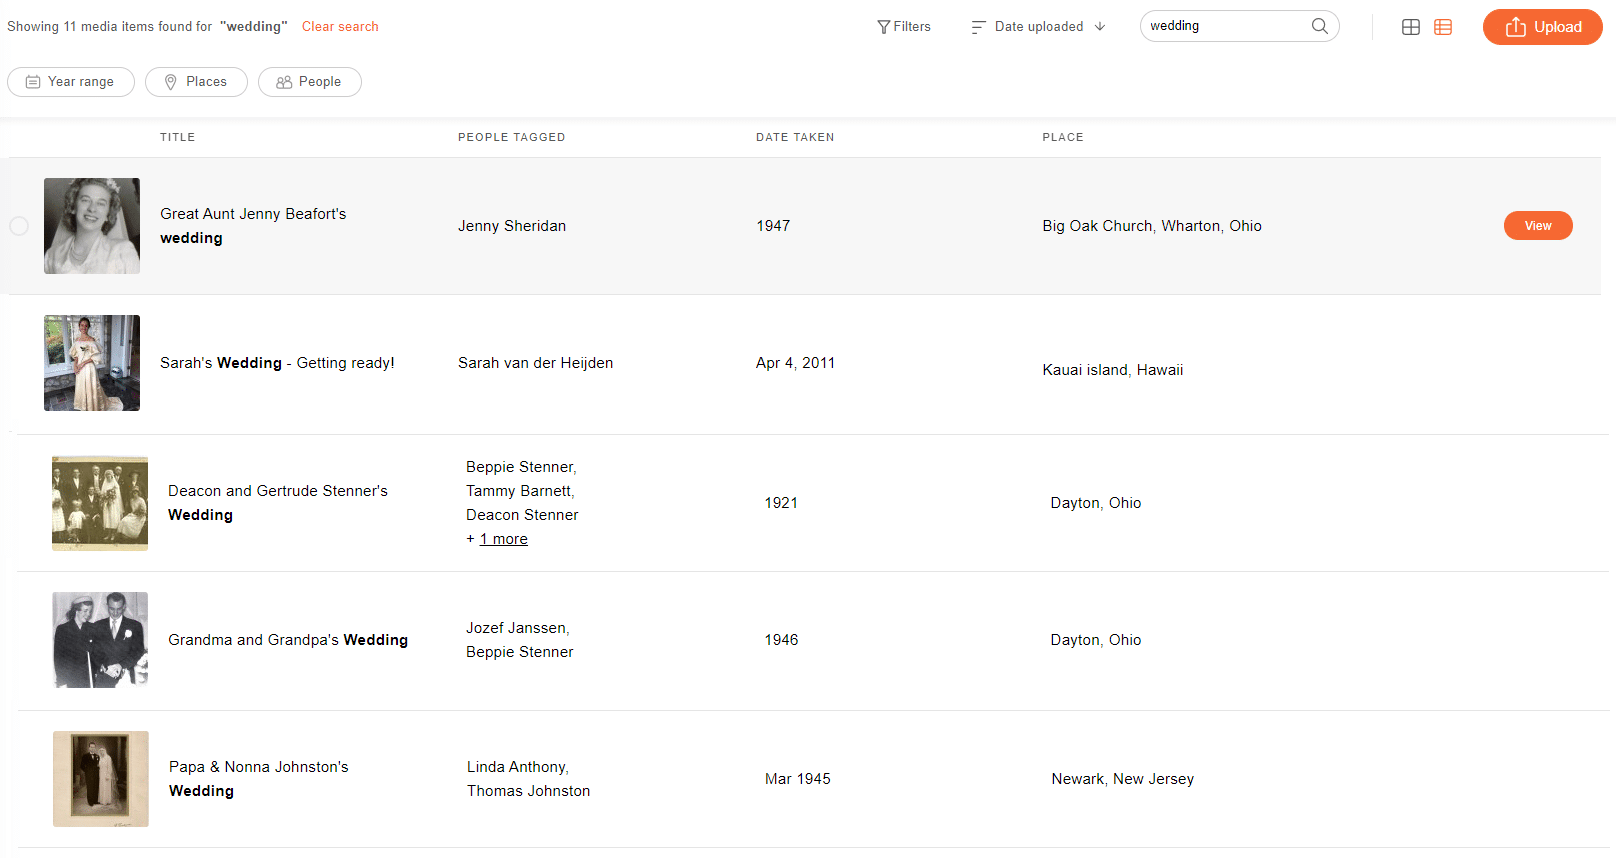
Search results in the List view (Click to zoom)
What’s coming next
As with most new features on MyHeritage, this is a first release, and we plan to enhance it in the near future. Coming up next will be the option to edit dates and places of photos with bulk actions in the List view. For example, if you uploaded a number of photos from your sister’s wedding, you will be able to select them all and update the place and date for all of them in one go.
The List view is best suited for large displays. It’s currently available when viewing your family site from a computer. In the future, it will also be available when visiting your site from a mobile browser.
While there are many advantages to using the new List view, and other advantages to using the Grid view, there are currently some functions available in one view and not in the other.
The Grid view includes options for managing albums that we have not yet rolled out in the new List view. The options are sharing an album, downloading an album, viewing the album details, or deleting an album. Another function currently unavailable in the List view is the option to select multiple photos and add them to an album. We will add these options to the List view in the next update. In the meantime, you can manage your albums on MyHeritage through the Grid view.
The ability to filter and sort photos is new and is currently only available on the List view. We plan to make it available on Grid view as well, in the future.
Conclusion
The new Photo List view is a powerful tool for assisting you in organizing and documenting your family photos. We hope you’ll enjoy using it to enrich your photos. We are open to feedback and suggestions as to what to add next.
Julie Boardman
January 5, 2022
Wonderful view – but what do I do with DUPLICATES. There seems to be many of the same photograph – is this necessary? Otherwise – great!